
Hello! Welcome back to my blog. Sorry if I have been missing in action last week. I was busy with work and with projects which will be revealed in the coming week. Stay tuned for it!
I know that winter is almost done but I can't let go of this card idea so just bear with me this last time then I will shift gears to creating spring cards.
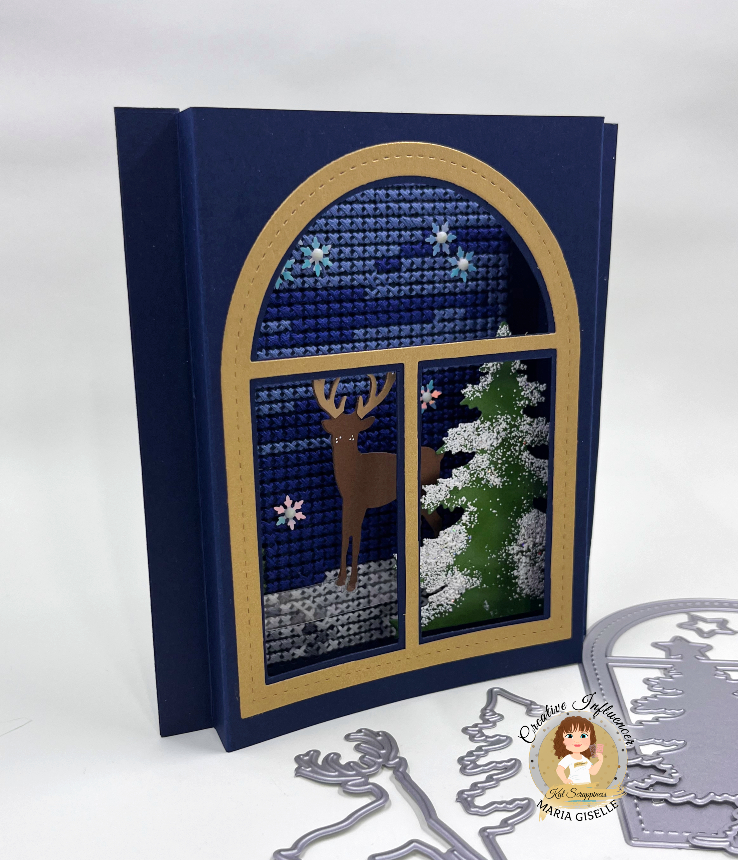
I got this pop-up card idea from Jennifer McGuire. I think the scene that I created works perfectly for this kind of card.
I started off with cutting a navy-blue cardstock at 4 1/4" x 5 1/2". I added stitching holes to do this using the Crafty Meraki Stitch-a-Cross slimline die. I cross stitched the background for the scene.
I trimmed two pieces of blue cardstock at 6" x 5 1/2". I scored this at 1/2" and 1" on the long side at each end. I creased this really well using a bone folder.
On one of the folded panels, I traced the inside of the window from the Kat Scrappiness The Night Before Christmas Window Scene dies. I used a craft blade to cut the pieces off to create a window. There are areas where there is a gap in the tracing line because of the tree but I just cut this straight connecting the ends of the traced lines. I adhered the cross stitched panel to the other folded panel.
I die cut the elements that I will use for my card. I die cut the window on a matte gold carstock. I cut the tree on a green cardstock. I die cut the small reindeer from the KS Reindeer Duo dies on a brown cardstock and light brown cardstock. I cut two pieces of the deer on brown cardstock.
I cut the tree off the window die cut, just following the lines of the window to cut it straight. I adhered this to the top of the blue panel with the window opening. Luckily, the window frame is smaller than the window frame. I thought that the window frame is exactly the same size as the window I cut. Now, I have a margin between the edge of the frame and the window. What a happy accident!
I blended green ink to the tree to create layers. On this inked portion, I dabbed Versamark ink. I mixed Wow! Midas Touch embossing powder and Wow! White Puff Powder embossing powder on a small jar. I poured this to the inked areas and heat embossed it. I repeated this several times.
For the deer, I cut the antlers off the light brown cardstock. I adhered this to one of the brown deer die cuts, making sure that the antlers are aligned. I applied Nuvo Midas Touch to the antlers. I adhered the deer's feet to an acetate strip using Glossy Accent. I adhered the other deer to the back of the deer.

I adhered the tree to one side of the folded panel, on the fold. I adhered the tip of the acetate strip to the other folded panel. I adhered silver sequins to the cross stitched panel. I added glow in the dark gems to the center of the snowflakes.
I added double adhesive tape to the folds and adhered it together. Now, my pop-up card is done. Below is a short video showing the interactive features of this card.
Thank you for viewing my card. Have a blessed, brilliant and creative day!
I added below the link to the Kat Scrappiness products I used on this card. There will be no additional cost to you should you decide to purchase a product. While you are at the Kat Scrappiness website, do check out their wide array of products especially the exclusive Kat Scrappiness products. There is also an ongoing slimline sale. Enjoy!
Maria Giselle B.
I am sharing this creation at

Incredibly inspiring, Maria! Love the interactivity, the glow in the dark, and the details. Thank you for sharing your woodland creation with us at Jan's Digi Blog Challenge. Good Luck!
ReplyDeleteHope you will join us again.
Hugs,
Jan
(Owner & Illustrator of Jan's Digi Stamp Shop)
Thank you for visiting my blog. I am glad that I have inspired you. Thank you for your comment.
DeleteHoly Moly! You put a lot of time and work into that beautiful cross stitched backgrounds!! So pretty!! Thank you for sharing with us over at Jan's Digi Stamp Challenges!
ReplyDeleteHugs,
Karen C
Thank you for visiting my blog & your lovely comment.
DeleteWhat an incredible masterpiece, Maria! And that you punched all those cross stitch holes yourself says that you love the craft. It's a beautiful keepsake. Thanks for the inspiration and for submitting your creation at Jan’s Digi Stamp Challenges . I hope to see more of your designs soon.
ReplyDeleteCrafting Smiles,
Donna
{Creative Smiles - my little crafting world}
Thank you for your lovely comment. The cross stitch holes were created by a slim die from Crafty Meraki. I should have more specific. I corrected this in my blog.
DeleteStunning card Maria. I love the addition of the cross-stitch too. Thank you for entering the Anything Goes Challenge at Jan's Digi Stamps.
ReplyDelete