Monday, May 25, 2020

Sketch & Color Inspired Card


Hello! I created this card to participate in My Favorite Things' Blog Challenge. I created one card to participate in two of their challenges, the Sketch Challenge and the Color Challenge. At the same time, I created this card for Father's Day. 

I die cut a white card stock using My Favorite Things Die-namics Mason Jar Mug. I blended Tim Holtz Mermaid Lagoon Distress Ink using Picket Fence Studios Life Changing Brush. I die cut a yellow patterned paper using the label die included in the die set. I heat embossed the sentiment on this label. I used the MFT First Place Sentiment Stamps Sets. I blended TH Antique Linen Distress Ink to this label to give it some depth. I also die cut 2 more labels and adhered this on top of each other for some dimension. 

For the stars, I die cut the wand part using a stem die from the MFT Fresh Cut Flowers die set. I die cut this multiple times on grey cardstock. I adhered 3 stems on top of each other for some dimension. I die cut 6 stars using the same grey card stock. I adhered a double sided adhesive tape on the same grey cardstock. I die cut the stars on this cardstock with the adhesive side up. I removed the release paper and dipped the star on TH Distress Glitter Pumice Stone. I burnish the glitter to the adhesive tape using a bone folder. I adhered a star on the back of the glittered star. I sandwiched the stem in between this star and the other star die cut. I placed something heavy on top of the stars while the glue dries. 

I die cut a silver mirror cardstock using SSS Stitched Rectangle die. I adhered the mason jar and the stars to this. 

I trimmed a 4 1/4" x 5 1/2" gray cardstock. Following the sketch, I die cut a border using the Simon Says Stamp Air Vent Border die. I cut a strip of blue glittered cardstock. I blended TH Mermaid Lagoon Distress Ink to this glitter paper to darken the shade. I adhered this to the back of the gray cardstock panel, making sure it is shows through the vent holes created by the die.


I adhered the mirror cardstock to this panel with foam tape.

Thank you for visiting my blog. Have a blessed, brilliant and creative day. Stay safe always!

Maria Giselle B. 

I am sharing this creation at


Wednesday, May 20, 2020

Playing With Transfer Gel


Hello! It is my second son's birthday today. He specifically said before that he does not want to receive cards anymore. So, I just created a card thinking about him. I also created this card to take part in Newton's Nook latest blog challenge.

I had the Deco Foil Gel for a while but did not get to trying it until now. I know that there is a newer, upgraded version of this gel. It will be a while before I will be able to try this product out since I just opened my jar.

I usually search the internet before I try out a certain technique or a product. Even if I have used a product before or have used a certain technique before, if it has been a while since the last time I used it or tried it, I still watch videos related to it as a sort of a review for me. This is exactly what I did with the Deco Foil Gel.

I positioned the Newton's Nook Confetti stencil on top of a dark blue cardstock using painter's tape. I evenly applied the Deco Foil Gel with a spatula, making sure that I covered all the open areas. I removed the stencil and placed the stencil in a basin with soapy water. I set the cardstock aside to dry.


I stamped the image from NN Newton Loves Cake on a vellum which I pre-treated first with an anti-static tool. I stamped this with Versafine Onyx Black ink and heat embossed it with a black embossing powder. I colored the image on the back side. I initially started with a Copic marker transitioning to Karin Decobrush markers. I am amazed that the Karin markers work on vellum, too! I fussy cut the image, leaving a small border around it. I colored the cat with one of my sister's cats, Kenny, as the model. 

Going back to the dark blue cardstock with the Deco Foil Gel, the only way to know that the gel is ready for foiling is if the gel has turned clear, which means that the gel is dry. I cut a piece of Gina K. Designs Glimmering Gold Fancy Foils. I cut it large enough to cover the cardstock with the gel. I placed this foil, shiny side up, on top of the cardstock with the gel. I sandwiched this inside a parchment paper  and an extra cardstock to act as a shim. I fed this through the Minc Machine. I am so amazed with the glimmery result!

To follow the sketch in the challenge, I trimmed a light blue cardstock to 5 1/2" x 4 1/4". I also trimmed a 5 1/2" x 1 1/2" blue cardstock. I created three panels with the foiled cardstock piece. I adhered a vellum to the center piece to mute down the shimmer. I embossed a sentiment to this, then adhered the image. After I have assembled my card elements to re-create the sketch, I wrapped a gold DMC thread around the card, securing it with a tape on the back. 


I adhered this to a top folding wide A2 note card.

Thank you for visiting my blog. Have a blessed, brilliant and creative day! Stay safe always!

Maria Giselle B.

I am sharing this creation at


Monday, May 18, 2020

Distress Ink Colored Digi. Dinosaur


Hello! We have a new challenge at Incy Wincy Designs Challenge Blog. The theme is Anything Goes. The image I am using is from one of our challenge sponsors, Cute As A Button.

I printed the image on Strathmore Bristol Smooth paper. I heat set the image to dry the it and prevent bleeding when I color it. I decided to color the image pink. I used Tim Holtz Distress ink in Picked Raspberry and Victorian Velvet to color the dinosaur. I colored the dinosaur's hair with TH Tumbled Glass Distress ink.

To color it, I pressed the ink pad on a palette and picked up the color with a paint brush. I colored the bone with Zig Kuretake Gansai Tambi watercolor. I mixed white and black for some gray shading. After this had dried off, I painted a the pearl white over it for some shine. I also used this on the collar. I added a small drop of white paint on the dinosaur's body spots and nails. I added gray dots on the dinosaur's cheeks. For the heart pendant, I used a Karin Decobrush metallic blue marker. I painted the grass with Zig Kuretake Gansai Tambi watercolor.

I fussy cut the image leaving a small border around it.

For the panel, I have this card base with a blended background on it for a while. I finally found some use for it. I muted this busy background with a vellum. Looking through my stash, I found this left over black frame that I cut with Simon Says Stamp Stitched Rectangles wafer dies. I also found a small black rectangle cut with the same die set. I usually keep my extra die cuts together with the dies just in case I find some use for it.

I adhered the vellum to the back of the frame. I adhered the stitched rectangle on the center of the vellum. I adhered the dinosaur on the black rectangle with foam adhesive. I added small dots on the background using Sakura Stardust clear glitter gelly roll pen.


For the sentiment, I embossed this on a grayish-blue cardstock. The stamp I used is from Paper Smooches Digits stamp set. I die cut this into a banner using Lawn Fawn Fancy Folded Banner die but only partially die cutting it since I only needed the fish tail ends. I adhered this on the bottom of the image with foam adhesive.

Thank you for visiting my blog. I cannot wait to see what you created. Have a blessed, brilliant and creative day. Stay safe always.

Maria Giselle B.


I am sharing this creation at


Tuesday, May 12, 2020

Sketch, Color and Shape Inspired Birthday Card


Hello! Have you created a card in which your intent is to submit it to three different challenges? And, this is before you actually create the card. I challenged myself to create a card combining three different challenges. And this is what I came up with. What made it easy for me is that all three challenges are by My Favorite Things. All I had to do is look through my MFT supplies and create away.

I stamped images from MFT Snuggle Bunnies stamp set on Strathmore Bristol Smooth paper using Versafine Onxy Black ink. After the stamped images have dried, I colored it with Karin Deco Brush markers with colors based on the Color Challenge. I fussy cut the images leaving a white border around it.

I die cut several cardstocks using MFT Wonky Stitched Circle die for the solid circles. I die cut another cardstock with a stitched outline circle die to add variation. Adding circles is the challenge theme for MFT's Birthday Project Challenge.

For the sketch challenge, I am using a top folding A2 note card. I secured a stencil slightly on an angle on the bottom of the front of the card, just like in the sketch. I blended Tim Holtz Tumbled Glass Distress ink through the tiny holes of the stencil. I had to use a heavy hand to make sure the ink goes through the holes. The stencil I used is Simon Says Stamp Tiny Dots stencil.

For the sentiment, I heat embossed a sentiment stamp from MFT BB Beary Special Birthday stamp set on a blue cardstock strip. I used Hero Arts white embossing powder. To make the sentiment pop out some more, I blended the same TH Distress ink to this strip. I wiped off the excess ink with a dry cloth.

I blended the same TH Distress ink on the largest blue circle die cut then splattered some white paint to it. I dried this with a heat tool. I blended Hero Arts Unicorn White pigment ink to the orange circle. I also blended Tsukineko Delicata White Shimmer pigment ink to the circle frame just for added interest.


I adhered the elements of the card to the front of the card using a liquid adhesive. I added the critters with foam adhesive. I rounded the corners with We R Memory Keepers Corner Chomper.

Thank you for visiting my blog. Have a blessed, brilliant and creative day. Stay safe always!

Maria Giselle B.

Turns out that I did not made it to the Sketch Challenge. That's alright. Anyway, thank you for the inspiration!

I am sharing this creation at


Friday, May 8, 2020

Metallic Watercolored Card


Hello! I created this for my husband who is celebrating his birthday next week. I also created this card so I can join the Hero Arts' Blog Challenge with the theme on Watercolors.

I used Finetec, Coliro and Kuretake Gansai Tambi watercolors for this card. For the background, I taped a 5 1/2" x 4 1/4" Strathmore watercolor paper on a board. I sprayed iCraft Removable Pixie Spray onto the Hero Arts Zig Zag Pattern stencil and positioned this on top of the watercolor paper. I was going to paint the panel with Coliro Pearl Deep Space watercolor only but I want the color to be more vibrant. I mixed a dark blue Kuretake Gansai Tambi watercolor to the Coliro watercolor on a palette. I painted the watercolor panel with this paint mix, leaving some open areas to apply gold paint instead for some interest.


For the letters, I painted a scrap watercolor paper with Finetec watercolor. I heat set this to dry. I die cut the HA Fancy Dies Alpha Uppercase to spell out Happy Birthday. I also die cut these letters on black cardstock so I can adhere this to the back of the gold letter die cuts for extra dimension for the letters. 

I heat embossed the heart from HA Written in the Stars stamp set on a black cardstock using HA Unicorn White pigment ink. I embossed this with a Wow! Pearl White embossing powder. I painted the heart with Finetec watercolor. I fussy cut the heart leaving a small border around it. 

I adhered the heart to center of the lay-out. I adhered the letters after, following the zig zag pattern of the stencil. I added black pearls. I trimmed a sliver off the edges. I adhered this panel to a black cardstock. See how shimmery this card is?


Thank you for visiting my blog. Have a blessed, brilliant and creative day. Stay safe always.

Maria Giselle B.

I am sharing this creation at


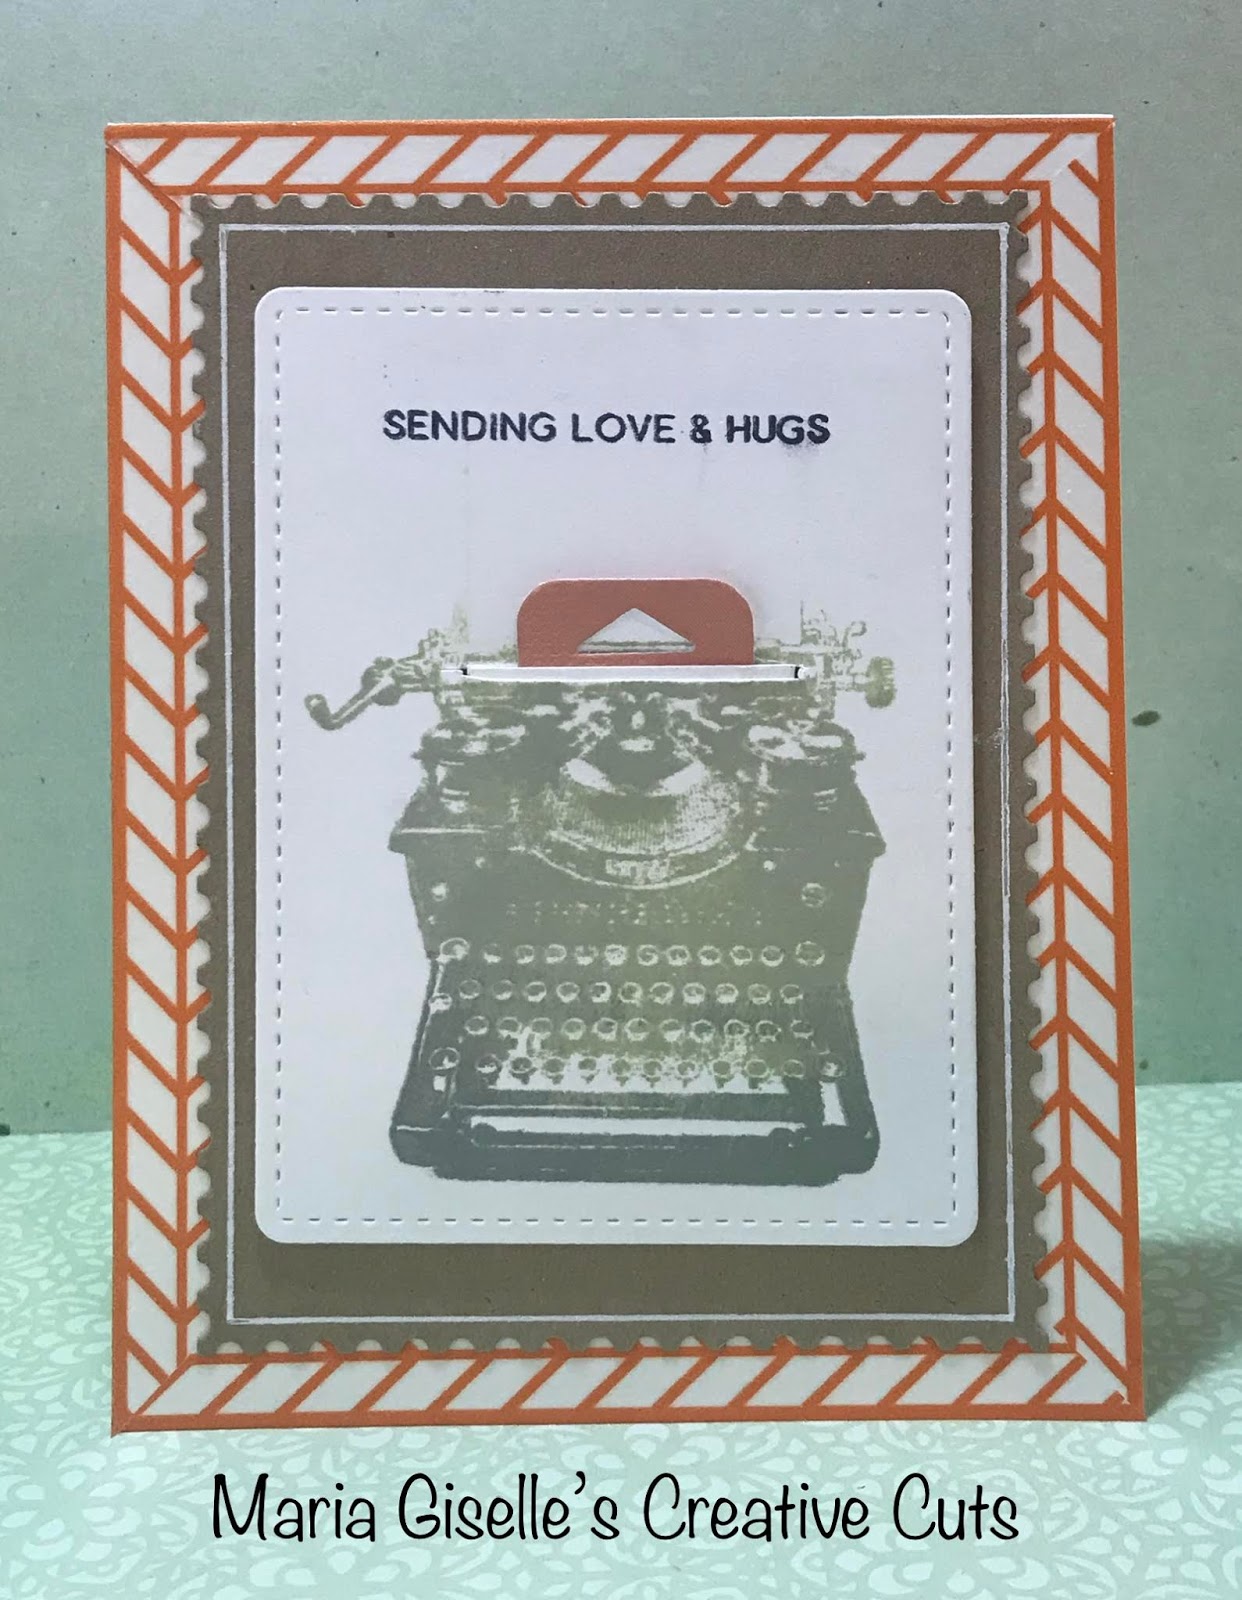
Creating An Interactive Card Using A Stamped Image


Hello! I am guest designing at https://artydivaschallenge.blogspot.com/2020/05/guest-designer-maria-giselle-batan.html today. Thank you, Zowie, for giving me this opportunity.

I am using a Close To My Heart Typed Note stamp set. This is my prize after being the random winner at the Double Trouble Challenge last January. Only now was I able to get to play with this stamp set. 

I die cut a white card stock using Mama Elephant Peek A Frame Creative Cuts. I stamped the typewriter using a light and medium gray dye inks, with the darker gray more on the front of the typewriter. I used a Misti Stamping Tool to stamp the typewriter so I can create the ombre colored effect on the typewriter. There is a paper coming out of the typewriter as part of the stamp. I avoided applying ink to this outline, and rubbed off any ink with my finger before stamping the image. 


Using a craft knife, I created a slit on the area where the paper will come out of the typewriter. After measuring its width, I cut a white card stock using the same width. I based the length of this tab on the paper image on the stamp image adding a fourth of an inch on the base to create a stopper so as not to pull the the tab out. I stamped the sentiment on this tab which is also a part of the stamp set. I die cut a colored card stock using this pull tab direction die from Lawn Fawn Flippin' Awesome die set. I adhered this to the back of the sentiment tab and double this up with another white card stock for more durability.

I stamped another sentiment on the top of the typewriter to fill in that white space. The sentiment is from Altenew Adore You stamp set. 

I placed foam adhesives to the back, creating another stopper so that the tab will not go all the way in. I adhered this to a kraft card stock that I die cut with a postage edged die from the same Mama Elephant die set. I drew in a line around this postage die cut using Uni-ball Signo Broad Point White gel pen. 

I adhered this to a top folding note card with the edges covered with an Freckled Fawn orange chevron washi tape. 


I created this card in time for Mother's Day but this stamp set is very versatile that you can use it also in creating a masculine card. You can also customize the sentiment by using a typewriter instead of the sentiment stamps included in the set as long as the message fits the tab or the paper outline.

Thank you for visiting my blog. Stay safe always. Have a blessed, brilliant and creative day.

Maria Giselle B.

Monday, May 4, 2020

Rainbow Colored Books Bookmark


Hello! We have a new challenge at Incy Wincy Designs Challenge Blog. Today's theme is Books. Our sponsor for this challenge is Oddball Art Co.

I re-created a card created by Kristina Werner which featured a stamp with books. She created a bookmark as the focal point of the card. She used Zig Clean Color Real Brush Markers on her card.

I created a longer bookmark since I will use a slim card for a card base which measures 4" x 9 1/4".

I printed the image on Strathmore Bristol paper. I taped this to a hard board. Using the same colors as Kristina did on her card, I colored the books on a rainbow pattern although I missed the order in some parts. I colored the books alternately to allow the water color to dry and prevent color bleed. I used a water brush to blend the colors out. I also tried my best to avoid the printed lines since I noticed that it does bleed despite adjusting the printer set-up to photo print.

After I am done coloring the books, I added details to the books using Sakura White Gel pen and Prismacolor color pencils. I added a light wash of color to the background.

For the sentiment, I used a sentiment from Newton's Nook Book Club stamp set. This sentiment stamp came as a one-lined sentiment stamp. Instead of cutting the stamp, I masked the stamp so I only stamp one word at a time, and come up with a three-lined sentiment. I used Versafine Onyx Black ink and also used the Misti Stamping Tool for a good impression.

I trimmed off the edges and rounded the corners with We R Memory Keepers Corner Rounder.

For the background, I cut a slim card sized black card stock. I stamped this with My Favorite Things Typewriter Text Cling Background stamp. I used the Misti Stamping Tool on this step. I removed the paper and foam from the Misti. I positioned the stamp on one of the corners of the Misti. The letters come as straight line on the stamp but I want it diagonal for extra interest. I positioned the black card stock diagonally on top of the background stamp, added temporary adhesive to the back of the card stock, and closed the Misti door to it. I treated the black card stock an anti-static pouch. I applied Versamark ink to the stamp then closed the Misti Door. I poured different colored embossing powders to the stamped area, creating a rainbow pattern. I should have used the red glitter embossing powder over the plain red embossing powder since the latter did not show up brightly on the black card stock.

Since I have a longer card than the stamp, and not to forget that my card is tilted, I was not able to stamp the whole card in one stamping. I drew a line on the back to give me an idea where to start stamping again. Doing the same process as above, using the pencil marks, I lined up my black card stock on the top edge of the background stamp, then started stamping again with Versamark. I miscalculated the gap between the edge and the first line of letters so I had a bigger gap in between these lines. To fix this, I found a dotted line stamp in my stash and stamped this on the gap to make it less noticeable.


I punched tabs to hold the bookmark using the We R Memory Keepers Envelope Notcher Punch.

Thank you for visiting my blog. I hope to see your creations in our latest challenge at Incy Wincy Designs. Have a blessed, brilliant and creative day! Always stay safe!

Maria Giselle B.