Monday, February 24, 2025

Tulip Cake Inspired Easel Birthday Card


Hello! Welcome back to my blog. Today's card was inspired by a photo of tulips cake and cupcakes. I used Kat Scrappiness dies on this card. At the end of the post is the list and links to the to the products I used in case you are interested to check it out.

I worked on the tiered cake first. The KS Build a Cake Craft dies create cake layers that is not the height of the cake tier that I want mine to be. To make the cake tier taller, I partially die cut a cake layer on navy blue cardstock. I partially die cut the bottom portion first then I moved the die towards the top of the cardstock which was cut to my desired tier height. The middle portion was not cut. I just used a pair of scissors to complete the cut, thus, creating a taller cake tier.

I die cut a matte gold cardstock for the bottom portion of the cake. 

I adhered these layers on a scrap piece of cardstock to create a single piece of embellishment. I cut off any excess being careful not to cut any part of the cake.

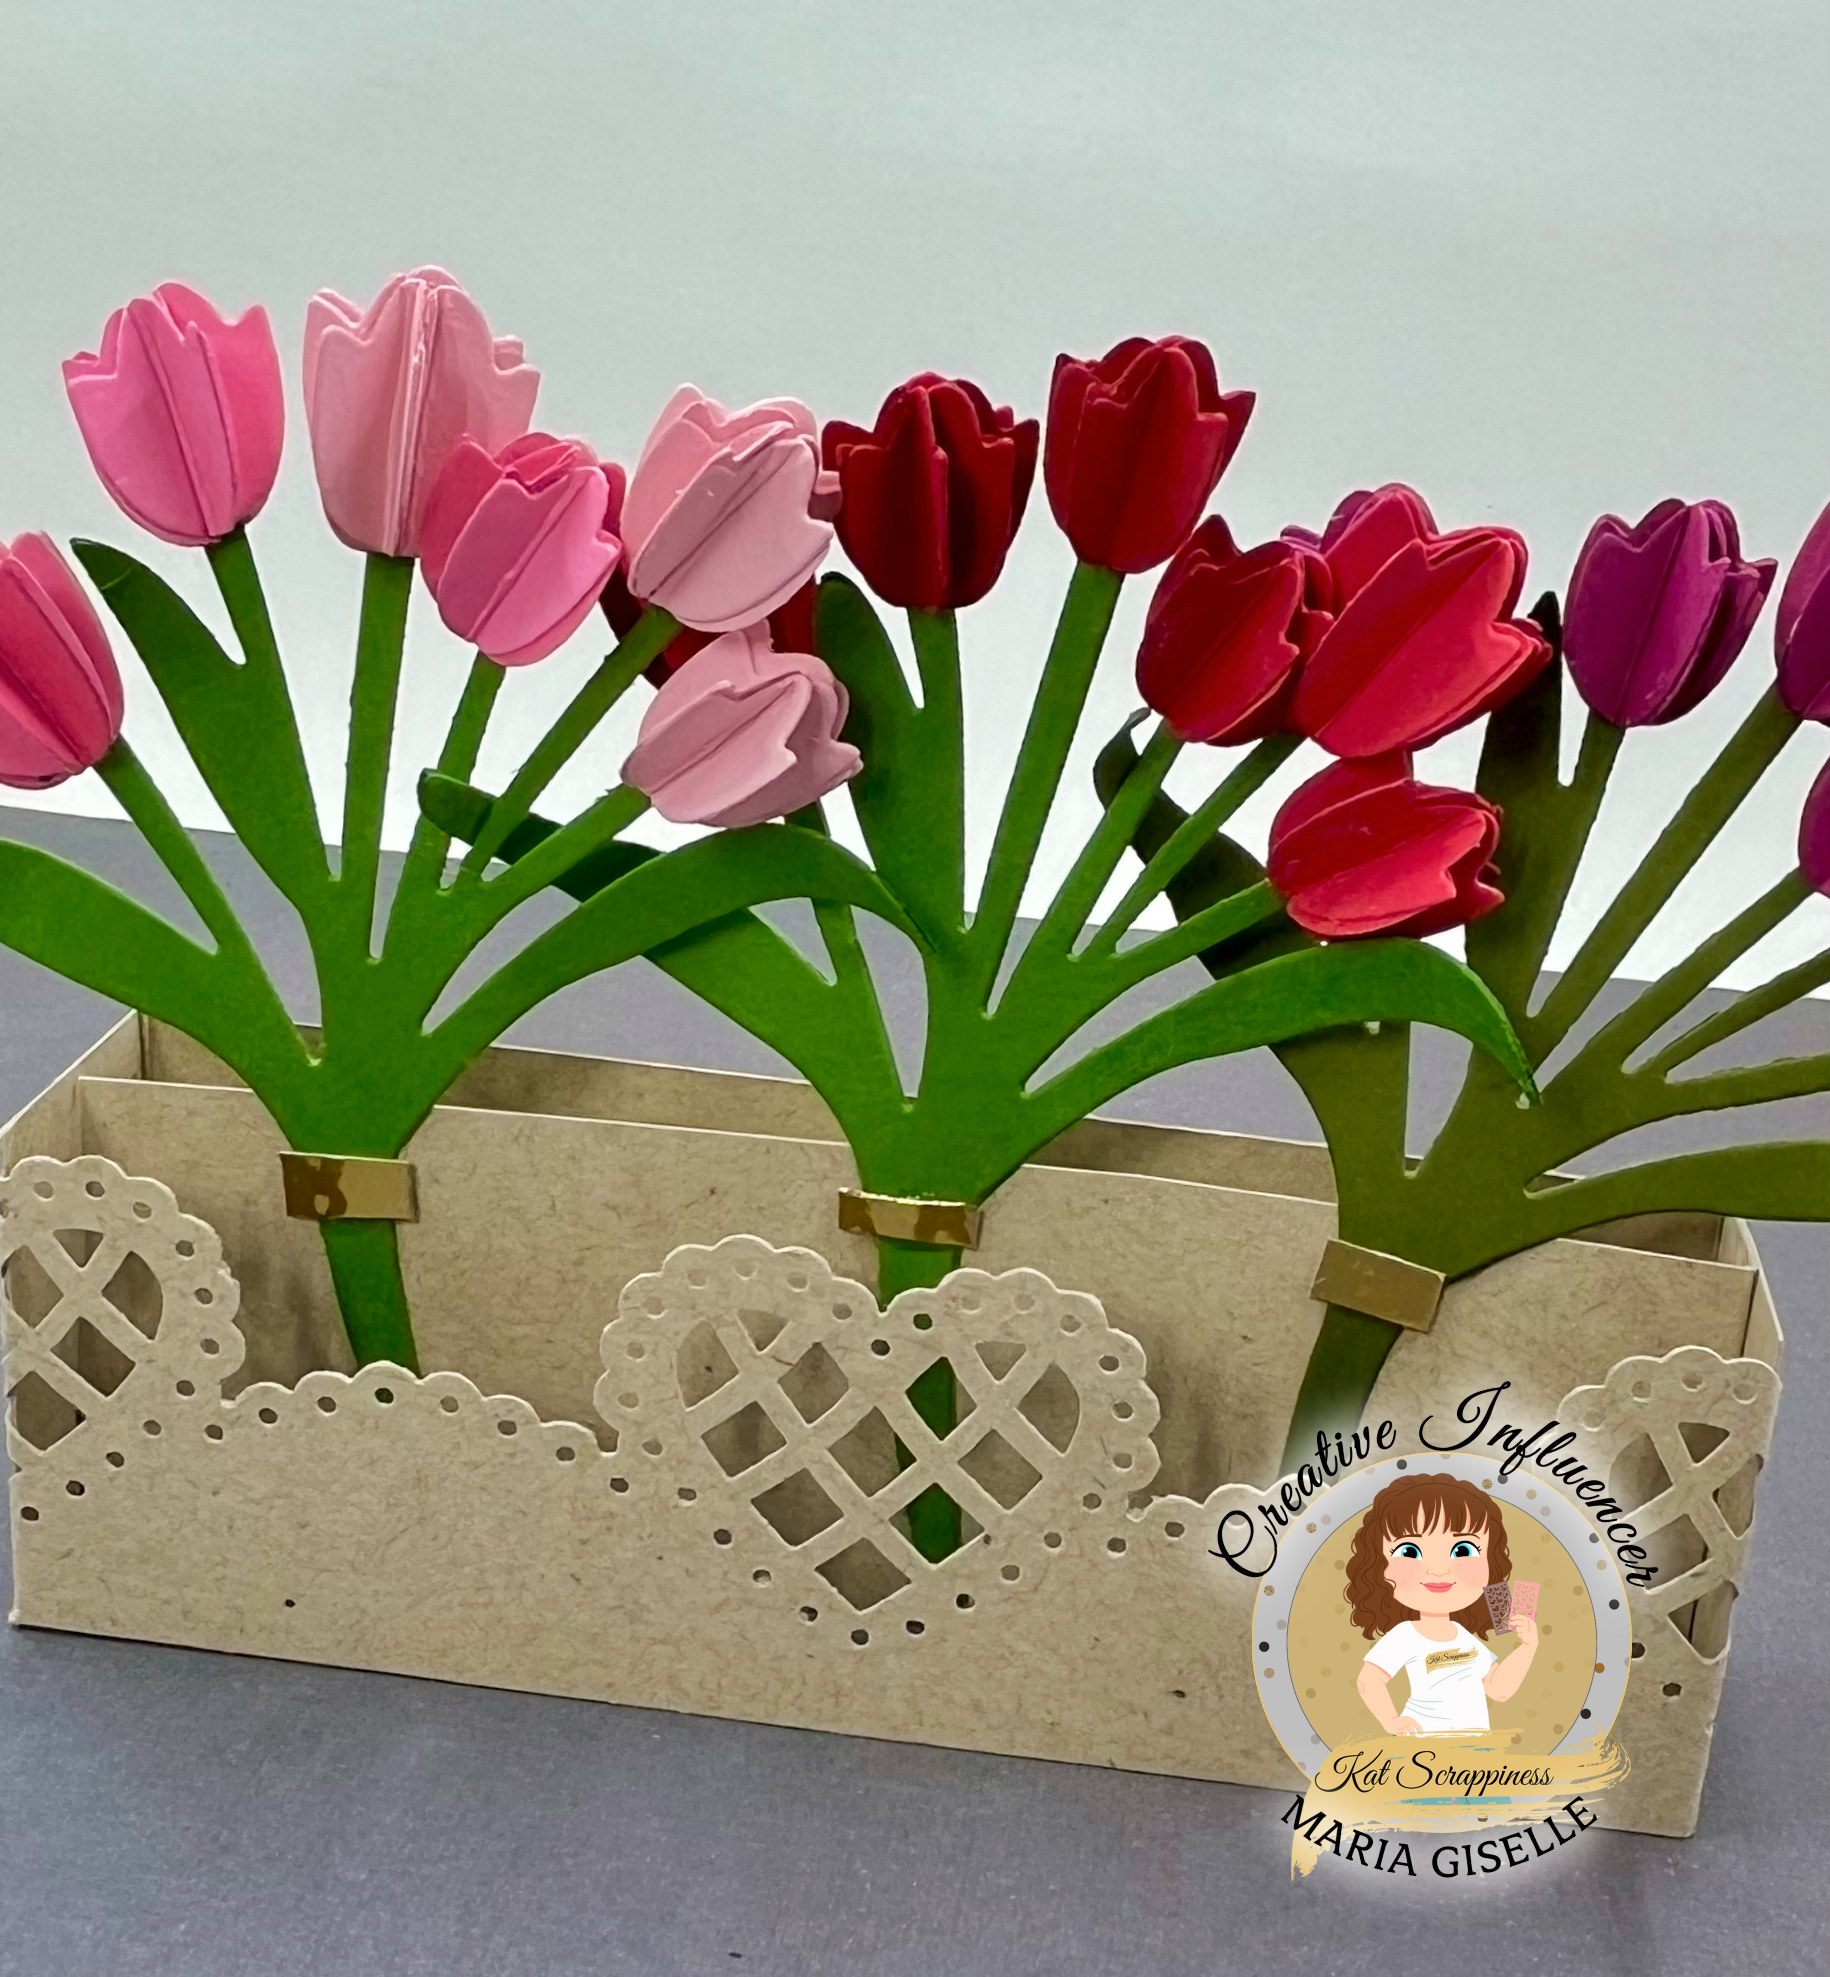
I die cut the flowers from the KS Layered Tulip Bouquet craft dies on different shades of pink cardstock. I die cut the stems and leaves on green cardstock. I adhered the center layer of the tulip over the base tulip. I only applied a line of glue on the center so I can zhush this center layer later on. 

I planned the lay out of the flowers on the cake. I adhered the flowers to the stems. I did a lot of die cut surgery during this portion of the project. I want to have an even distribution of the flowers and leaves on the cake. I adhered the tulips to the cake and snipped off the excess stems/leaves. 

I added dots to the cake using white enamel glue for some added pop. I added dots of glittered glue to the trim of each cake tier. I set this aside to dry.

I worked on the bow next. I die cut three bows on a blue cardstock. The bow die is from the KS Layered Tulip Bouquet craft dies. I snipped off the bow tails on two of the bows. I adhered the three bows by adding a dot of glue on the center of the bow. I shifted the bows so that it will add layers to the single bow. I added white dots to this bow using a white gel pen. I adhered this bow to the top of the cake. I adhered a navy blue sequin then topped it with a glass bauble. 


For the easel panel, I die cut a white cardstock with the KS Buffalo Plaid Background craft die. I die cut three pieces of it. Luckily, the negative cuts did not drop off on one of the die cuts. I set this piece aside. This will be used as a stopper to hold the easel up.

I trimmed a piece of vellum at 4 1/4" x 5 1/2". I adhered this to the back of one of the plaid background die cuts. I adhered the other die cut to the back of the vellum, making sure the plaid pattern is aligned. I adhered the cake on this panel.

I trimmed a heavy weight white cardstock at 4 1/4" x 11". I scored this at 5 1/2" on the long side to create a top folding card. 

I trimmed the third plaid panel shorter, leaving three rows of the pattern only. I took note of the pattern on the bottom portion of the plaid panel so that the cut out will make the plaid design continuous. I used this trimmed plaid die cut as a guide on where to score the front of top folding card. I used a pencil and lightly mark that area, then scored it using a scoring tool. 

I adhered the trimmed plaid panel to the inside bottom portion of the card. I pieced in the square negative cuts to create a flat panel. 


For the sentiment, I die cut the KS Happy Birthday Shadow Sentiment craft die on a navy blue cardstock. I adhered this to the inside of the card, on top of the trimmed plaid die cut.

I adhered the plaid panel to the front of the card, applying glue to the bottom fold only. 


I hope you like today's card. Thank you for visiting my blog. Have a blessed, brilliant and creative day!


I added below links to the Kat Scrappiness products I used on this project. There will be no additional cost to you should you decide to purchase this product. While you are at the Kat Scrappiness website, do check out their wide array of products. Enjoy!

I am sharing this project at

Saturday, February 15, 2025

3D Window-Shadow Box


Hello! Welcome back to my blog. I am very honored to be one of the Guest Designers this month at the Paper Rose Studio blog. I am featuring the Farmhouse Friends 12x12 paper collection and Farmhouse Friends Backgrounds 6x6 paper collection in my project. This paper collection has a spring feel with flowers and animals as part of the design. These collections fits an Easter project, too. 

Today's project has a lot of design elements in it. It is not only a window-shadow box card, but it also has an interactive feature and a surprise greeting card incorporated in it. Below are photos of my process in creating this project.

1. Creating the shadow box


The size of the shadow box depends on the element you plan to put in the recessed portion of the shadow box. My shadow box measures 5.5" x 5.5". My inside element measures 4.5" x 4.5". To know what size of paper to begin with, you add 1/2" on each side of the the inside element and 2" on each side for the scores. In my project's case, 4.5" + .5" + .5" + 2" + 2"=9.5". Since my shadow box is a square, I cut my paper at 9.5" x 9.5".


I scored this paper at 1/2", 1", 1.5", 2", 7.5", 8", 8.5" and 9". I rotated the paper 90 degrees and repeated the scoring. On one of the sides, I scored at 2.5" and 7" up to the second scored line as seen on the photo above. I rotated the paper 180-degrees and repeated the scoring.

If you noticed, there is an outline on the right side of the photo above. This is where I cut the paper. I repeated this on all four corners of the panel so that it will look like the panel on the photo below.


I folded the paper on the scored lines, reinforcing it with a bone folder.


I folded the paper inwards toward the center.


I applied liquid glue to the bottom side of the outermost fold on the straight edged tabs. I folded this in half. I clipped the folds with mini laundry clips while the glue is drying for better adhesion. Use the adhesive you are most comfortable with. I prefer liquid adhesive because it gives me some wiggle time before the glue sets in. Just make sure not to squeeze the bottle too much when using liquid adhesive so as not to have a big blob of glue on your project.


The curved sides of the shadow box should perfectly fit to the straight edged sides. Put a dot of adhesive on the the diagonal cut, on the side that will get in contact with the rolled up side. 


To embellish the shadow box, I trimmed a patterned paper from the 6x6 pad at 5.5" x 5.5". Using a trimmer or a craft knife, I trimmed a 1/2" frame on the inside of this panel as seen on the photo below.


I adhered this frame on the frame of the shadow box.


I adhered the left over piece on the recessed part of the shadow box. I trimmed a sliver off each edge to make this paper perfectly fit the space.

2. Creating the window cover


I trimmed a patterned paper from the 12x12 paper collection at 5.5" x 5.5". I die cut a window at the center of this panel using the Paper Rose Window 1 Metal Cutting die. 


I trimmed a white cardstock at 5.5" x 5.5". I lined this with the windowed patterned paper and secured it with low tack tape. This prevents any shifting since I will be running this through my die cut machine again. I snapped the window die in place using the opening as a guide. In this way, I will be assured that the windows are aligned with each other.


On the reverse side of the windowed patterned paper, I applied double adhesive tape.


I cut an acetate larger than the window but smaller than the panel. I adhered this to the double adhesive tape.


I die cut three more windows on white cardstock. I adhered the three pieces on top of each other to create some dimension. I used the fall out piece as well but I adhered this to the back since I want the window on the top to be white in color as seen below.


I applied double adhesive tape over the acetate. This is my preferred adhesive on slick surfaces like an acetate. Liquid adhesive will also work but it will take a while for this to dry because of the slick surface.


I used liquid adhesive to adhere the window onto the acetate. I lined the window die cut to the window that is already adhered to the acetate on the front of the shadow box cover. This piece gives this portion of the project a smooth finish.


Using the adhered window die cut as a guide, I adhered the white windowed panel to cover the back of the patterned paper. 


3. Adding the interactive feature

To make this cover interactive, you will need two sizes of a circle die or two circle punches with different sizes. I die cut a small circle on the top corner of the window cover as seen below. 


I die cut two pieces of circle using the larger circle die, one on white cardstock and the other on the same patterned paper I used for the cover. I suggest using an 80 lb. cardstock for the hinge since this does not fray when the hinges are folded. I cut the white circle die cut into a shape as seen below. 


I folded the straight cuts and threaded these through the hole on the window panel as seen below.


I flattened these folded hinges and applied a dot of glue on the top of these hinges. I adhered the other circle die cut to this, covering the hole and the hinges.


On the back side, I added glue to the back hinges. I adhered this to the shadow box, making sure that this panel and the shadow box are aligned. You can see how this looks on the first photo on this post.


4. Creating the surprise element

I trimmed a light gray cardstock at 9" x 4.5". I scored this at 4.5" on the long side. I used the Paper Rose Vintage Hello clear stamp for the sentiment. This is a large stamp so I highly recommend using a stamp positioner. I used the printed transparency that comes with the stamp to plan the placement of the sentiment on the card. After I laid this printed transparency on the inside of the card, I aligned the stamp and picked this up with the door of my stamping tool. I removed the transparency and inked the stamp. 


Since this is a large stamp, I used a pressure tool, a white board eraser, in transferring the ink to the cardstock. 


I did a dual colored stamping. I used a coral colored dye ink for the top portion of the sentiment, and a light blue ink for the bottom portion of the sentiment. The stamp positioner is very helpful in achieving this look. All I did after stamping the top portion of the sentiment is to clean the stamp, then ink the bottom portion of the sentiment with the blue ink, and stamp this on the cardstock.


For the front of the card, I trimmed one of the 6x6 patterned papers to 4.5" x 4.5". I strategically cut this keeping in mind of what part of the background I want to be seen seen through the window on the cover. 


I adhered the patterned paper to the front of the card. I trimmed a sliver off the top and side (where the card opens) so it will nestle perfectly in the box.


I hope you like today's project. Please visit the Paper Rose Studio Blog for more inspiration. Have a blessed, brilliant and creative day!

Maria Giselle B.

I am sharing this project at

Monday, February 10, 2025

Stand Up Happy Heart


Hello! Welcome back to my blog. For today's project, I challenged myself to create a stand up character so I can participate in the Lawnfawnatics challenge on Anything But A Card or Tag. It took me a while to plan this out since I was hoping to make the heart stand with just the die cut legs. But it keeps falling down so I have to create a ground for the heart and an invisible support to keep the heart stable while upright. 

I used the Lawn Fawn Stitched Happy Heart die set for my project. I die cut two pieces of the heart on red cardstock. I die cut the arm/hand on purple cardstock. I die cut the legs using the stick die on the set. For the feet, I used the cheek dies on the set. I die cut two pairs of the arms and legs, and 3 pairs of the feet on purple cardstock. I will layer these die cuts to make the heart character more sturdy.

On one of the hearts, I adhered the arms and legs. I scored a pair of the feet die cuts, about two-eighths of an inch from one end. I adhered the scored portion to the end of the legs. I adhered the other die cuts underneath these scored feet to add dimension and hopefully, some stability. Unfortunately, there is some struggle in making the heart stand up. To solve this problem, I created a base to keep the stand up heart stable when upright.

I die cut the eyes and mouth on black cardstock. After adhering it to the heart, I added details to the eyes using a white Sakura gel pen.


I die cut two pieces of oval shapes on heavy weight cardstock. To add more support to the stand up heart, I trimmed a strip of thick acetate. I scored this at 1/2". Using a craft knife, I cut a slit on the oval piece where I inserted the folded end of the acetate. I stamped a sentiment on the oval piece using a stamp from LF On The Mend stamp set. After I treated the area with anti-static powder, I stamped the sentiment using Versafine Onyx black ink and clear embossing powder. I curved the stamp using the oval die as a guide to add a bit of interest to the base.

I inserted the scored end of the acetate through the slit and adhered this to the other side of the oval piece using a double adhesive tape. I adhered the other oval die cut for a clean base. 

I added double adhesive tape to the other end of the acetate. I squirted dots of glue to the bottom side of the feet of the stand up heart. I adhered the back side of the heart to the acetate. 

For the other heart die cut piece, I stamped the sentiment using stamps from the LF Happy Everything stamp set. After treating the area with anti-static tool, I embossed the sentiment with Versamark ink and white embossing powder. 


I am planning to mail this to Mrs. Fitzwater's 3rd Grade class in Oklahoma. Her class is collecting hearts for Valentine's Day from all over the country and hopefully, from all over the world. I hope this arrives in time. My stand up heart, when folded in its feet, does not fit an A2 envelope. I will either have to create my own envelope for it or mail it using an A4 envelope. This is something I will keep in mind if I plan to recreate this in the future with the intent of mailing it.

I hope you like today's project. I hope this happy heart made you smile. Thank you for visiting my blog. Have a blessed, brilliant and creative day!

Maria Giselle B.

I am sharing this project at


Sunday, February 9, 2025

3D Tulips on a Square Vase


Hello! Welcome back to my blog. Today's project can be a Valentine's gift to a special person. Looks tedious to create but the end product will surely wow the recipient. 

I used the Kat Scrappiness Layered Tulip Bouquet craft dies on this project. I die cut the stem/leaf on green cardstock. I die cut extras to double up this die cut to make it sturdy for this project. Doing this step depends on what type of cardstock you are using. I used a heavy cardstock on the die cut on the right so I did not need to double it up. 

For the flowers, I cut the base layer of the tulips on pink, red and purple cardstocks. The craft die set comes with a piece to layer on top of this base die which I did not use on this project. The die set came with 3 tulip sizes. 


To achieve the 3D look, I cut a lot of this base layer. I used five die cuts per tulip. It is a lot of die cutting. I grouped the tulip die cuts, having five pieces of die cuts per group. 


I scored 4 die cuts in a group. The one that is not scored is for the backing of the flower.

I reinforced the folds using a bone folder.


I adhered one tulip die cut to the other, adhering half of the die cut with the other die cut until I adhered all of the 4 pieces. 

I set this aside to dry. I used a mini clothes pin to press the adhered tulip die cuts together while the glue is drying. I repeated this process until all tulips are assembled.

For the vase, I was going to use the KS Pop Up Box craft die but the side tabs were too short for the look that I want to achieve for my project. I did use the dimensions of the pop up box craft die on the vase. I just cut the tabs 1/4" longer than what the die cuts. The final measurements of the vase are 6 3/4" x 1 1/4" and 5 1/4" x 1 1/4". I cut 2 pieces of the longer piece. I scored these long pieces at 1/2" and 6 1/4". This will be the front and the back of the rectangular vase. For the shorter piece, I scored this at 1/4" and 5". This piece will be adhered on the center where the tulip bouquets was adhered.

I punched one of the longer pieces using a heart edge punch. I assembled the box. 


I adhered the 3D tulips to the stem/leaf die cut. I adhered the tulip that was not scored to the back of the 3D tulip.

I snipped a piece of gold mirror cardstock and adhered it to the stem. The craft die set comes with a bow die. The bow size was too large for my vase that I was afraid it will make the vase overcrowded. 

This tulip vase can be put up on display. 

I hope you like today's project. Have a blessed, brilliant and creative day!

Maria Giselle B.

I added below a link to the Kat Scrappiness product I used on this project. There will be no additional cost to you should you decide to purchase this product. While you are at the Kat Scrappiness website, do check out their wide array of products. Enjoy!

I am sharing this project at