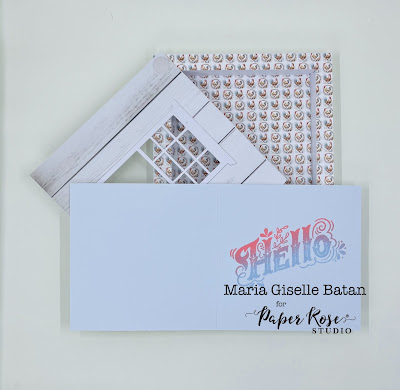
Hello! Welcome back to my blog. I am very honored to be one of the Guest Designers this month at the Paper Rose Studio blog. I am featuring the Farmhouse Friends 12x12 paper collection and Farmhouse Friends Backgrounds 6x6 paper collection in my project. This paper collection has a spring feel with flowers and animals as part of the design. These collections fits an Easter project, too.
Today's project has a lot of design elements in it. It is not only a window-shadow box card, but it also has an interactive feature and a surprise greeting card incorporated in it. Below are photos of my process in creating this project.
1. Creating the shadow box
The size of the shadow box depends on the element you plan to put in the recessed portion of the shadow box. My shadow box measures 5.5" x 5.5". My inside element measures 4.5" x 4.5". To know what size of paper to begin with, you add 1/2" on each side of the the inside element and 2" on each side for the scores. In my project's case, 4.5" + .5" + .5" + 2" + 2"=9.5". Since my shadow box is a square, I cut my paper at 9.5" x 9.5".
I scored this paper at 1/2", 1", 1.5", 2", 7.5", 8", 8.5" and 9". I rotated the paper 90 degrees and repeated the scoring. On one of the sides, I scored at 2.5" and 7" up to the second scored line as seen on the photo above. I rotated the paper 180-degrees and repeated the scoring.
If you noticed, there is an outline on the right side of the photo above. This is where I cut the paper. I repeated this on all four corners of the panel so that it will look like the panel on the photo below.
I folded the paper on the scored lines, reinforcing it with a bone folder.
I folded the paper inwards toward the center.
I applied liquid glue to the bottom side of the outermost fold on the straight edged tabs. I folded this in half. I clipped the folds with mini laundry clips while the glue is drying for better adhesion. Use the adhesive you are most comfortable with. I prefer liquid adhesive because it gives me some wiggle time before the glue sets in. Just make sure not to squeeze the bottle too much when using liquid adhesive so as not to have a big blob of glue on your project.
The curved sides of the shadow box should perfectly fit to the straight edged sides. Put a dot of adhesive on the the diagonal cut, on the side that will get in contact with the rolled up side.
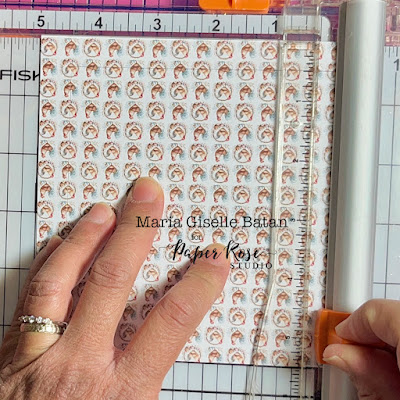
To embellish the shadow box, I trimmed a patterned paper from the 6x6 pad at 5.5" x 5.5". Using a trimmer or a craft knife, I trimmed a 1/2" frame on the inside of this panel as seen on the photo below.
I adhered this frame on the frame of the shadow box.
I adhered the left over piece on the recessed part of the shadow box. I trimmed a sliver off each edge to make this paper perfectly fit the space.
2. Creating the window cover
I trimmed a patterned paper from the 12x12 paper collection at 5.5" x 5.5". I die cut a window at the center of this panel using the Paper Rose Window 1 Metal Cutting die.
I trimmed a white cardstock at 5.5" x 5.5". I lined this with the windowed patterned paper and secured it with low tack tape. This prevents any shifting since I will be running this through my die cut machine again. I snapped the window die in place using the opening as a guide. In this way, I will be assured that the windows are aligned with each other.
On the reverse side of the windowed patterned paper, I applied double adhesive tape.
I cut an acetate larger than the window but smaller than the panel. I adhered this to the double adhesive tape.
I die cut three more windows on white cardstock. I adhered the three pieces on top of each other to create some dimension. I used the fall out piece as well but I adhered this to the back since I want the window on the top to be white in color as seen below.
I applied double adhesive tape over the acetate. This is my preferred adhesive on slick surfaces like an acetate. Liquid adhesive will also work but it will take a while for this to dry because of the slick surface.
I used liquid adhesive to adhere the window onto the acetate. I lined the window die cut to the window that is already adhered to the acetate on the front of the shadow box cover. This piece gives this portion of the project a smooth finish.
Using the adhered window die cut as a guide, I adhered the white windowed panel to cover the back of the patterned paper.
3. Adding the interactive feature
To make this cover interactive, you will need two sizes of a circle die or two circle punches with different sizes. I die cut a small circle on the top corner of the window cover as seen below.
I die cut two pieces of circle using the larger circle die, one on white cardstock and the other on the same patterned paper I used for the cover. I suggest using an 80 lb. cardstock for the hinge since this does not fray when the hinges are folded. I cut the white circle die cut into a shape as seen below.
I folded the straight cuts and threaded these through the hole on the window panel as seen below.

I flattened these folded hinges and applied a dot of glue on the top of these hinges. I adhered the other circle die cut to this, covering the hole and the hinges.

On the back side, I added glue to the back hinges. I adhered this to the shadow box, making sure that this panel and the shadow box are aligned. You can see how this looks on the first photo on this post.

4. Creating the surprise element
I trimmed a light gray cardstock at 9" x 4.5". I scored this at 4.5" on the long side. I used the Paper Rose Vintage Hello clear stamp for the sentiment. This is a large stamp so I highly recommend using a stamp positioner. I used the printed transparency that comes with the stamp to plan the placement of the sentiment on the card. After I laid this printed transparency on the inside of the card, I aligned the stamp and picked this up with the door of my stamping tool. I removed the transparency and inked the stamp.
Since this is a large stamp, I used a pressure tool, a white board eraser, in transferring the ink to the cardstock.
I did a dual colored stamping. I used a coral colored dye ink for the top portion of the sentiment, and a light blue ink for the bottom portion of the sentiment. The stamp positioner is very helpful in achieving this look. All I did after stamping the top portion of the sentiment is to clean the stamp, then ink the bottom portion of the sentiment with the blue ink, and stamp this on the cardstock.
For the front of the card, I trimmed one of the 6x6 patterned papers to 4.5" x 4.5". I strategically cut this keeping in mind of what part of the background I want to be seen seen through the window on the cover.
I adhered the patterned paper to the front of the card. I trimmed a sliver off the top and side (where the card opens) so it will nestle perfectly in the box.
I hope you like today's project. Please visit the Paper Rose Studio Blog for more inspiration. Have a blessed, brilliant and creative day!
Maria Giselle B.


WOW! All I can say is WOW. You did a lot of great work on this, and it's fabulous. Thanks for showing the entire process. It's amazing and I'm SO grateful to have you share your talents with us at Word Art Wednesday. I'm super excited to see more of your wonderful art and creativity, and I sure hope you will continue to share with us at Word Art Wednesday. Have a blessed day.
ReplyDelete