Thursday, June 29, 2017

Creating Two Cards Using TH Distress Oxide


I am playing with Tim Holtz Distress Oxide inks creating two cards today from one blended panel. The inspiration for this card are these two lovely people that I have met at my work place. We do not work at the same department. Our departments happen to share one floor of the building. I would usually cross paths with them on my way home from a night shift. They are so kind, they always wish me well on my way home. This act of kindness somehow made me look forward to going home on days that I will see them. Despite the challenging times at work, the kindness they show encourages me to look at the bright side of things.

I embossed two pieces of Strathmore Bristol paper using Essentials by Ellen Designer Dies Stitching Lines. I blended TH Spiced Marmalade and Worn Lipstick Distress Oxide. I spritz the paper with diluted Perfect Pearl. I used a heating gun to dry this panel. I die cut a window at the center using a Simon Says Stamp Stitched Rectangles saving both negative & positive pieces. I also die cut a vellum using this die which I will use for the sentiment later on.

I blended several Distress Oxide again for the flowers and leaves. I used TH Wilted Violet, Fossilized Amber and Peeled Paint. I spritz this with the shimmer spray as well, drying it with a heat gun. I die cut the flower and leaves using EH Bold Blossom Stand-Alone die. I don't have the matching die to cut the solid flower so I traced the a scrap flower die cut onto the blended yellow panel and fuzzy cut it. I adhered this to the back of the flower die cut.

The sentiment is from EH Bold Blooms stamp set. I avoided inking a part of the sentiment to customize my sentiment. I inked this using Versafine Onyx Black ink. I didn't use the Misti to stamp the sentiment. I wish I did. Some parts of the sentiment wasn't dark enough. I used a black embossing powder to fix this problem. I also stamped another sentiment from EH Spread the Sparkle Sentiment using Versafine.


I pieced the die cuts together, interchanging the negative and positive dies cuts of the blended and white pieces. I adhered the vellum to the blended rectangle to mute down the color since I will adhere  the blended flower and leaves to this. The pieced panel was adhered to a top folding 4 1/4" x 5 1/2" white note card.

My family's favorite is the blended frame. How about you?

Thank you for visiting my blog. Have a blessed & brilliant day!

Maria Giselle B.

I am sharing this creation at


Wednesday, June 21, 2017

Using Patterned Paper with Sentiment to Create a Card


I am still in Mina of Sing mode. I printed Elly twice on an 8 1/2"x11" cardstock. I positioned the image in a way that when I cut it in half, I end up with two top folding cards. You can see the first Mina card on my previous post on Animated Movie Inspired Sparkle & Shine Card. It is a one layer card with glittered embossing and using a metal die to create an impression on the cardstock.

For this card, I was aiming for another one layer card using the same steps as my first card but I made a mistake on my shim layers while I was embossing the metal die on the cardstock. This is after I have colored the image. I didn't really want to put to waste what I have already done so, I went ahead and die cut the image using a Pretty Pink Posh Scalloped Circle die, the die I was using to create the impression. I adhered flower sequins to the scalloped border die cut. I adhered a flower sequin to every other scallop. When I was down to my last scallop, I figured that the scallops are odd numbered, leaving me with two scallops in between the sequin flowers. Oh well. It is too late to remove all the sequins. I just left it as is.

I adhered a circle fun foam to the back of the scalloped die cuts. I created  a ground for Elly using Copic markers. I masked the image and spritz W Plus 9 Shimmer Spray. I adhered flower sequins to the flower on Elly's head. I added Glossy accents to the skirt.


For the background, I used a Forever Friends patterned paper. I cut the paper, strategically centering the sentiment that is printed on the paper. I embellished the paper using a Sakura Clear Gel and White Gel pen. The flourishes has stitching print on it. I doodled on the other flourishes to re-create this stitching. I used a glue pen to trace on the sentiment, then heat embossed it using clear powder. I used the Sakura White Gel pen to outline this sentiment.

I added embossed stitching to the edges using Lawn Fawn Stitched borders. I added an arrow paper clip to cover a part of the bear that is part of the patterned paper. If I have a flower paper clip, I would have opted for that. I adhered the background panel to a top folding card, then adhered the scalloped die cut with the digital image.


Thanks for visiting my blog. Have a blessed & brilliant day!

Maria Giselle B.


I am sharing this creation at


Wobbly Cricut Die Cut Birthday Card


I had my 5 year old son participate in creating this card by making him choose through the Cricut images. This cute cupcake image is from Cricut Create a Critter cartridge and the one he chose for the birthday celebrant. I just followed the colors of the die cut layers adding details to some of the layers. I blended a Simon Says Stamp Doll Pink dye ink on the pink frosting. I applied clear Wink of Stella on the brown layer which will show through the holes for the eyes and mouth. I stamped dots on the purple cupcake wrapper using a stamp from Mama Elephant Boutique Borders stamp set. using Versamark ink. I heat embossed this using Wow! Pearl White embossing powder. I ran a marker on the sides of the red cherry to hide the white core of the red shimmer paper. I added Glossy Accent to the cherry.

I splattered and sprayed Prima Cotton Candy Color Blooms to the front card base. After this has dried, I stamped the sentiment from Lawn Fawn Party Animal stamp sets using Versafine Onyx Black ink. I heat embossed the sentiment using clear embossing powder. I personalized the card by stamping the celebrant's name using Lawn Fawn Violet's ABC stamp set.

I made this into an interactive card which is usually a sell-out to kids or even grown-ups. Am I right? I adhered the die cut to the card base using an Action Wobble spring. Here is a video showing the Wobble Spring in action.


I stamped another birthday sentiment on the envelope from Mama Elephant Make A Wish stamp set. Since this is a big stamp, I used the Misti Stamping Tool to repeatedly stamp the sentiment until I get a good impression.


Thanks for viewing my blog. Have a blessed & brilliant day!

Maria Giselle B.

I am sharing this creation at


Monday, June 19, 2017

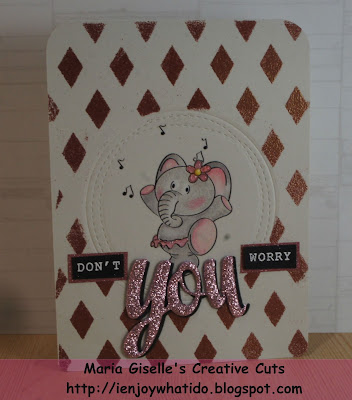
Animated Movie Inspired Sparkle & Shine Card


Have you seen the animated movie Sing? I love this movie, its story, the characters, and the singing. When I saw this digital image sponsored by Sasayaki Glitter, I cannot help but think of one of the characters in the Sing movie, Meena, the teenage elephant who has a huge stage fright but with a very beautiful voice.

I printed the image on Bazzill Taffy cardstock. I colored the image using Prismacolor pencils. I created a border around the image by embossing an MFT Die-namics Wonky Stitched Circle die. I masked this circle area. I positioned a Wendy Vecchi Diamond Stencil for Art on top of the card front, taping both the card and the stencil to avoid shifting. I pressed the Versamark ink to the stencil. I poured Simon Says Stamp Rose Gold embossing powder to the card front, brushing off any stray powders. Making sure the heat gun is hot, I heat embossed the diamonds.


For the sentiment, since this is a Meena of Sing inspired image, might as well have a Meena sentiment to go along with it. This time, the sentiment is based on the title of the song Meena sang, Don't You Worry 'Bout A Thing. I die cut a glittered foam using an Avery Elle-ments Simply Said You die. I die cut this sentiment again on black cardstock to act as a shadow for the glittered sentiment. The rest of the sentiment is from a Mama Elephant Happy Everything stamp set. I stamped this on black cardstock and heat embossed it with white powder. I adhered this to a pink glittered tape to tie in with the color scheme of the card.

I added Tonic Nuvo drops to the flower and the elephant's tutu for added shine.

Thanks for visiting my blog. I hope you join us in today's Incy Wincy Designs Sparkle or Shine Challenge. I can't wait to see your lovely creations. Have a blessed & brilliant day!

Maria Giselle


I am sharing this creation at


Sunday, June 18, 2017

Accordion Father's Day Card


I have several things in mind as I create this card. First, is my inspiration for this card, which of course, is my husband, the father of my 4 sons. Second, when I make a card, I sometimes look around blog challenges to see if I can come up with a card that meets its challenge rules. And last but not the least, since this is a card for someone special, I want to include my sons' participation in creating this card. Their involvement makes this card even more special and meaningful to me and I am sure, to their dad as well.

I die cut 4 mason jars using Canson Watercolor paper. The die is from My Favorite Things Die-Namics Mason Jar Mug. I know there is a rule of uneven numbers but each jar represents a son of ours. I color the jars using Tim Holtz Distress Oxide ink based on MFT blog's Color Challenge. I stamped a star from MFT First Place Sentiments stamp set on the blue mason jar. Good thing, I used the Misti Stamping tool to stamp the star on the inked mason jar. Despite using Versafine Onyx ink, which usually gives good coverage, I had to re-stamp the star several times. I heat embossed the star using clear embossing powder.


The sentiment 'Best Dad' is also from the same stamp set. After I used the anti-static tool on the star, I stamped the sentiment using Versamark ink. I used a clear acrylic block to stamp this time. I made sure my hand will not shift given the slick surface of the embossed star. I heat embossed this sentiment using white embossing powder. The effect of this technique, heat embossing on heat embossed image, is so cool. It looks like it was created using a one step process. 

I also die cut the straw and the label to create a secondary sentiment for the front panel. The sentiment is from MFT Mason Jar Labels stamp set. The sentiment is stamped with Versafine Onyx Black ink and heat embossed with clear embossing powder.

The front and back panels are 4 3/4" x 6" brown cardstock. An odd size but this is based from the size of the accordion cards, as detailed later. To add a background to this, I stamped an MFT Diagonal Sripes Cling rubber stamp. I rotated the rubber stamp to create vertical lines instead of diagonal lines. I used a Tsukineko Delicata White Shimmer Ink pad. 

I adhered the mason jars next, using foam adhesive on the blue mason jar and the label.


The accordion part is made of 4 print-out cards of a freebie from Crafts Unleashed. I only used the second part of the print-out. I think it would be fun to have the boys fill it up. They also have a chance to show their artistic talent since there is a space to draw. I printed this using a laser printer so I was able to foil the portrait border using the Minc Machine. I adhered a strip of white cardstock to the back of the cards to connect it. I adhered the card panels to the ends of the accordion.


I adhered the Photo Play Catch of the Day cardstock to the back. This is a late add-in detail to this card. The first time I saw this cardstock, I knew I would be able to use it to create a card for my husband since he loves to fish. But it wasn't available in stores as a sheet until Checkered Cottage agreed to purchase a part of the line and reserve this cardstock for me.


Thank you for visiting my blog. Have a blessed & brilliant day. Enjoy your Father's Day with your dads.

To my Amang, Happy Father's Day! I hope you feel better soon.

To my husband, Clemente, I hope you love our little surprise to you.

Maria Giselle B.

I am sharing this creation at


Monday, June 5, 2017

Zodiac Card Set


Hello! Welcome to our new challenge at Incy Wincy Designs. Our challenge is Anything Goes. I am using images from Knitty Kitty, one of our sponsors for this challenge.

As soon as I saw this digital set, I fell in love with it. It reminded me of a stamp set from Mama Elephant that I have my eyes on but never get to acquiring. I was inspired by the cards made by Val using the Mama Elephant stamp set. And, when we talk about zodiac signs, I just cannot leave one image behind, right? Because if I will be asked to create a card using one image from this set, of course, I will lean towards my birthday zodiac sign which you will find out what it is at the end of this post.

I colored the images using Copic markers. I fuzzy cut the images, leaving a small border around each image. For the background, I am using a Hero Arts Star Galaxy Background rubber stamp. I played around with this rubber stamp, using different inks and different kinds of paper to ink on. I die cut this background using a frame die from Mama Elephant Peek A Frame Creative Cuts die set. The sentiment is from Hero Arts Written in the Stars stamp set. I stamped the sentiment on white cardstock using Versafine Onyx black ink and heat embossed it with clear powder. I die cut the sentiment using Simon Says Stamp Stitched Rectangle die. For the star, I used Lawn Fawn Tiny Tags die. The sentiment and image were adhered with foam tape.

For the base card, I am using a 110lb. Neenah cardstock. I embossed the front of the base card using We R Memory Keepers Next Level 3D Gemstone embossing folder. I adhered the panels on this using fun foams.

I can't believe I came up with 12 note cards right away. It took me a while to create these but once I knew how one card looked and the steps to create it, the rest was just easy to make.

Aries (March 21-April 19) & Taurus (April 20-May 20)

Gemini (May 21-June 20) & Cancer (June 20-July 22)


Leo (July 23-August 22) & Virgo (August 23-September 22)

Libra (September 23-October 22) & Scorpio (October 23-November 21)

Sagittarius (November 22-December 21) & Capricorn (December 22-January 19)

Aquarius (January 20-February 18) & Pisces (February 19-March 20)

Sunday, June 4, 2017

Acrylic Painting for a Cause


I rarely get to attend crafting classes due to schedule conflicts but I was very fortunate to be able to attend one at Checkered Cottage. They offered a free painting class last June 1. I arrived with whatever paintbrush I own to find out that it is a painting class using acrylic paint. I only used acrylic once with a foam letter stamp. I am more into watercoloring.

Barb, the class instructor, was very supportive and patient for a newbie like me. The picture actually looked good, but I am the worst critic of myself. In real life, I didn't do a good job putting the highlights and shading. My colors were too strong..

I learned different techniques in acrylic painting. I learned about dry brushing with the use of a different kind of brush that I have never worked with before. To me, it looks like a miniature stencil brush. I also learned how to use a flat brush to create shadows. I don't think it is going to work using watercolors but I can give it a try. My flat brush is always used to apply a color wash to my background.

Now, the question is will I go into this as a part of my crafting. It was fun to learn acrylic painting but just like what one of the attendees said when they talked about stamping, that she doesn't want to go into stamping because of the cost. Same here. I have invested a lot on my own kind of crafting. I just wish I can attend these kind of classes again wherein I just bring myself and my paintbrushes.

Like the header says, this creation is not something to make and bring home. This will be donated to a hospital and will be given to parents who has lost a newborn to hold items that will make them forever remember their loved one. What more can I ask for in a class?

Thanks for viewing my blog. Have a blessed & brilliant day!

Maria Giselle B.