I can say this is the 3rd in a series of posts in my blog featuring the Hero Arts Floral Stamp & Cut by Lia. While I was working on the cards from my previous post (Using Negative Die Cuts to Create New Cards,) I made a mistake when I adhered a red card stock on top of the Scor-Pal double adhesive tape pad instead of the sticky back side. Because of this, I created a die cut with an adhesive on the back ready to stick. There is nothing bad to this except that it wasn't going to work with that project.
Instead of adding this die cut to my stash of die cuts, I challenged myself to create a card featuring this heart die cut. It was cut using a plain red card stock so the choice is whether to cut more of it in different colors and fuzzy cut the elements to create a colorful detail on the inner heart, or just to make it easy, just go ahead and color it in.
I used a white Wink of Stella brush marker to color in the flowers and the twigs. I colored in the twigs and leaves with a green Spica glitter marker. And for the flowers, I drew petals by following the contour of the cut. I applied dots of Viva Decor Pearl Pen in Pastel Rose to the center of the flowers.
For the background, I used a scrap patterned paper. I added detail to this using Lawn Fawn Stitched Borders, positioning the different dies on the spaces in between the words. I cut this at 1 3/4" x 3.5" and adhered it to the left side of the square note card which measures 3.5" x 3.5". The right side of the panel is the negative die cut card stock which I also used on the previous post.
The die cut heart is adhered to this panel. For the sentiment, I used a Doodlebug washi tape which I cut slim to be able to mat with a black card stock. I added detail to the sentiment by doodling a heart inside the o-heart on the word love with the use of a Uni-Ball Signo pen. I also added random dots of Viva Decor Pearl Pen to the card stock negative cut side.
Thanks for viewing my blog.
Maria Giselle B. I am submitting this creation to:
On my previous post, I created a partially die cut card. I didn't want to throw the negative cut created from this step so I created a card with the mission to make use of this and not scrap it.
I was playing with the Hero Arts Floral Stamp & Cut by Lia and die cut two hearts using scrap patterned papers. It didn't blend with my previous created card plan. To be one with my mission, I am going to use this die cut hearts, too.
I want to add glitter to the negative die cuts of the heart. To achieve this, I need to use a Scor-Pal double adhesive tape sheet. Peeling one side, I adhered a coordinating card stock to it. Keeping the top release paper, I ran this with the die using the Sizzix Big Shot. Some of the release paper fell off. You can adhere it back. With the help of a kraft knife, carefully lift the release paper, trying to keep the release paper covering the negative spaces adhered. Line up the heart patterned paper die cut and adhere. Use a bone folder to burnish the patterned paper to the double adhesive sheet. I cut off the extra to reveal the heart shape die cut. I lost some of the negative die cut pieces but I didn't worry about it.
Now, it's time to peel off the backing sheet of the negative spaces of the die. I poured Elizabeth Crafts Silk Microfine Glitter in Cool Diamond to these areas. After returning the extra glitter back to the jar, I used my finger to burnish the glitter to the adhesive. To clean up, I used a Swiffer cloth to wipe off the excess glitter.
The card's front panel measures 3.5" x 3.5". I cut a 2 3/4" x 3.5" black card stock. I dry embossed this using We R Memory Keepers Next Level Embossing Folder Gemstone. I added a thin cardboard to act as a shim to make the impression deeper. I didn't think the impression was deep enough on the first card (with the reddish/pink glitter) but I decided to keep it as is. It is totally up to you if you want to add a cardboard or not.
My card base is a top folding white note card, cut at 7" x 3.5" and scored at 3.5". I adhered the embossed panel flushed to the left of the note card. I adhered the negative die cut flushed to the right of the note card. I added detail to this part of the lay-out by running it through my Big Shot using a Lawn Fawn Square Stitched Stackable Die for added detail to the edge. I adhered the heart die cut using foam adhesive, piecing it to the negative die cut.
For the sentiment, I embossed the sentiment from the Hero Arts Handmade Kindness stamp set on a strip of black cardstock using white powder. I cut a fish tail on both ends. I also colored in the the spaces on the letters with a white color pencil for added detail. I adhered this to the center of the heart.
For a last detail, I randomly squirted some Viva Decor Pearl Pen in Pastel Rose to create dots that will mimic enamel dots.
Thanks for viewing my blog. Have a brilliant day!
Maria Giselle B. I am submitting this creation to:
It's that time of the year were some of us get busy getting ready creating their Valentine's exchange. I created several cards using the Hero Arts Floral Stamp & Cut by Lia. I only partially die cut the heart onto the front of a note card measuring 3.5" x 7" scored at 3.5". To partially die cut, center the die onto the front of the note card, position the top cutting plate onto the area you want die cut, in this case towards the right edge of the heart, towards the card opening. Using a craft knife and with the guide of a ruler, I cut the card stock where the cut ends. This will reveal the half-heart shaped card front. Using the same die, I die cut glittered papers and directly adhered this onto the card front, making sure I line up the partial die cut heart with the front of the note card. Use a liquid adhesive since this allows some 'buy' time to wiggle the die cut while aligning it.
I embossed half of the inner note card, the one showing through the partial die cut, using We R Memory Keepers Next Level Embossing Folders. I only sandwiched the area I want embossed, same technique I used with partial die cutting.
I stamped the sentiment from the Hero Arts Handmade Kindness stamp sent onto a vellum and poured white embossing powder onto it. I allowed the heat gun to be on for a while before pointing it towards the vellum piece to avoid warping. I applied dots of liquid glue to the back, to areas where there is concentration of the stamped sentiment to hide the glue. I randomly applied dots of Viva Decor Pearl Pen in Pastel Rose to the sides of the heart to add more accents. To finish off the card, I punch the outer top & bottom edges using We R Memory Keepers Crop-a-Dile.
Thanks for visiting my blog. Have a brilliant day!
Maria Giselle B. I am submitting this creation to:
The card I created in my previous post inspired me to create more cards using the same technique but with different colors. I forgot that my sister's favorite color is violet so the first card I made is not suited to be given to her on her birthday on the 26th. She's turning -ty-6. This was a joke we learned from our uncle when he tells us how old he is.
I only used one ink for this card, which is the Hero Arts Grape Juice. I just adjusted the pressure while blending the ink. The Strathmore Bristol paper made the blending easy without the need of using different shades of inks to get an ombre effect. I also spritz this card with WPlus9 Shimmer spray and allowed to dry before embossing the background stamp. I hope my sister likes it.
I used Doodlebug sequins for this card and topped it with Simon Says Stamp Tiny Flowers Sequins.
For this card, I used Tim Holtz Distress Ink (Broken China, Tumbled Glass, Faded Jeans) for the ombre panel. I used My Favorite Things Diagonal Stripes Background stamp.
A touch of Little Things from Lucy's Cards Nautical Sparkle Sparkly Shaker Selection completes the card.
Which one of the cards did you like? Thanks for visiting my blog. Have a brilliant day!
Maria Giselle B. I am submitting this creation to:
After seeing MFT's Sketch Challenge, the first thing that came to my mind is to stamp a background stamp onto an ombre patterned paper. I love an ombre patterned paper from Crate Paper Love Notes but the 6x6 pad came only with one sheet of this paper. So, I decided to recreate the paper by blending inks.
Using Strathmore Bristol paper, I blended 5 colors of Tim Holtz Distress inks. Once I was happy with how the colors are blended, I allowed it to dry before heat embossing. I could have dried it with a heat gun but I wasn't in a hurry doing this project.
After running an anti-static tool onto the ombre panel, I stamped the MFT Roses All Over Background onto the panel using Versamark ink. I stamped this by having the rubber stamp flat on the table. I placed the ombre panel on top of it. I then place a typing paper over the panel then carefully ran my fingers onto this stamping sandwich to transfer the impression to the paper without moving the ombre panel. I carefully lifted the ombre panel off the background stamped. I poured WOW! Embossing Powder Metallic Gold Rich Pale, then heat set it.
For the card base, I cut a 11" x 4 1/4" Kraft colored card stock and scored it at 5 1/2" to create a top folding card. I stamped the Roses All Over Background onto the front using MFT Kraft dye ink. I also stamped the sentiment onto a strip of Kraft card stock using Versamark ink. I masked the rest of the sentiment since I only want a one line sentiment. I poured American Crafts Zing! embossing powder then heat set it.
To create the horizontal panels, I wanted the widths of the panels varied from a thick one to a thin one. I trimmed the ombre panel into 5 using this concept and trimming in between the horizontal panels. I adhered the panels on the card base taking off the 4th from the top panel and replaced this with the sentiment strip. I adhered the sentiment strip and the 2nd from the top strip with foam tape to add more variation to the design. To finish up the card, I randomly adhered different shaped sequins from Little Things from Lucy's Cards. I love this!
I plan to create other versions of this card using this design. But the deadline of the MFT Sketch Challenge is in a few hours so I'll submit this card. I'll post the other cards in my blog once it is done.
Thanks for viewing my blog. Have a brilliant day!
Maria Giselle B. Supplies: Ink: Tim Holtz Distress Ink (Victorian Velvet, Worn Lipstick, Picked Raspberry, Tattered Rose, Antique Linen), MFT Hybrid Dye Ink (Kraft), Versamark Stamp: MFT Roses All Over Background, MFT You've Got Mail Embellishment: Little Things from Lucy's Cards Grapefruit Powder: WOW! Metallic Gold Rich Pale Regular, American Crafts Zing! Grapefruit
I started creating this card a little after New Year but didn't get to finish it until this week. But it is still the first month of the year. I intended to give this as a thank you note for a present I received during Christmas.
I started off by cutting the wine glass using my Cricut Imagine and Cricut Simply Charmed cartridge. I cut the image at 4 1/2" on a white pearl cardstock. I cut the same image twice using a white cardstock. The cut came with tick lines which is used to line up and adhere the layers. But I am not using the layers. Instead, I cut through those tick lines using a blade to create a window for the shaker. There is this one tick mark at the upper left hand of the wine glass that I couldn't get rid off. You can remove this if if you have the Cricut Design Space which I don't since it is not compatible with my Cricut.
I cut around the tick marks on one of the white wine glasses. I will use this to close the shaker window. I also used this as a guide to cut vellum for the window. I stamped a sentiment onto this vellum using a Fiskars stamp set. I treated the surface first with an anti-static tool, before stamping the sentiment using Versamark ink, then pouring some Wow! Embossing Glitter Platinum Sparkle powder. I heat set this but I allowed the heat gun to run heat first before pointing the gun towards the vellum to prevent warping.
I added embossing paste to the white cardstock that will seal the shaker window. But since I used vellum, it can hardly be seen through the vellum. So, you could probably skip this part. Somehow, it had a used in creating grooves for the sequins to get stuck. Using a clear acetate for the shaker can be an option too if you want to stick to the embossing paste design.
I used a thin double stick adhesive to adhere the vellum to the back of the window wine glass. I also used this in encircling the cardstock that will seal the window. I poured a small amount of sequins to this, then adhered it to the back of the pearl wine glass.
To make the wine glass sturdy, I adhered the other white cardstock wine glass cut out to the back of the wine glass. I applied a twine to the neck of wine glass. I squirted a small amount of strong adhesive behind the knot to keep it knotted.
I added a tag using left over dark gray cardstock. After I stamped 2016 on it and heat embossed it using the same powder, I cut a tag notch on the top part using a tag punch. Hand cutting this step is totally fine. I didn't want to punch a hole onto this being a small tag. I used a needle to create pinpoint holes where I threaded a silver thread to tie on the twine.
Thanks for visiting my blog.
Maria Giselle B. I am submitting this creation to the following:
I created this card for two reasons. First, I got inspired by the Kaisercraft heart flip die. After looking into this product, I thought, maybe I can create a card using the flip die concept. Second reason, I am still struggling on making videos on how I make my cards. Altenew was having their 3rd Video Challenge. I joined the first and knew the flaws of my video. I missed the 2nd challenge because I got fixated with the concept of a Christmas tree with red roses. With this one, after creating a demo card, I knew I would want to share how to create it.
The initial video was better than my first official YouTube video but the VideoMaker wasn't compatible with Windows 10 so it kept showing errors when I was trying to convert it of .mp4 format. I tired Mac IMovies but the first part of the real time video also showed an error in upload. I was left with no choice but to go to the net for a free video editor. I found one indeed but as I was going to save it, it popped a message that I have to buy the program to avoid their pop up during the video. Having less than an hour before the submission link closes, I decided to go ahead and just let it be. Now, my video has a good lighting, good focus on the process but no background music, and no instructions be it a caption or voice over. Oh, well.
Doing layered stamping takes some practice but Altenew has a stamping guide at their website: http://cdn.shopify.com/s/files/1/0388/7541/products/Vintage_Roses_guide_grande.jpg?v=1441387290 http://cdn.shopify.com/s/files/1/0388/7541/products/Vintage_Roses_leaves_1024x1024.jpg?v=1441387291.
Also, there is a video on how to use the Vintage Rose stamp set: https://www.youtube.com/watch?v=m4rs5vygtck.
Also, finding the inks to layer is also a challenge. Try with what you have first and when you find the right inks to layer, what I do is I right the combo on a sticky note paper and stick this on the back of the printed stamping guide.
Layered stamping does not only mean proper positioning of the layers but also choosing the right colors of each layer. For this card, I am using two inks of a gray shade. Since the flower I chose have 4 layers, I am going to do 2nd generation stamping in between the layers. I also like to stamp extras in case, so I have a bunch to choose from in case some of of the layering didn't work out. I also wrote the ink combinations on a sticky note and place this inside the sleeve together with the stamp set and the stamping guide that I printed out.
When stamping the leaves, the shade of colors come in reverse order compared to stamping the flowers. With the leaves, you go with the lightest shade then going to the darker shade. Also, with the leaves, I wrote numbers on the stemmed leaves and on its coordinating leaf layering stamp. This saves you time trying to figure out which leaf coordinates with which.
Using the coordinating dies (Yes, I finally have them!), I die cut the flowers and the leaves. Setting the cut-outs aside. it is time to work on the card base.
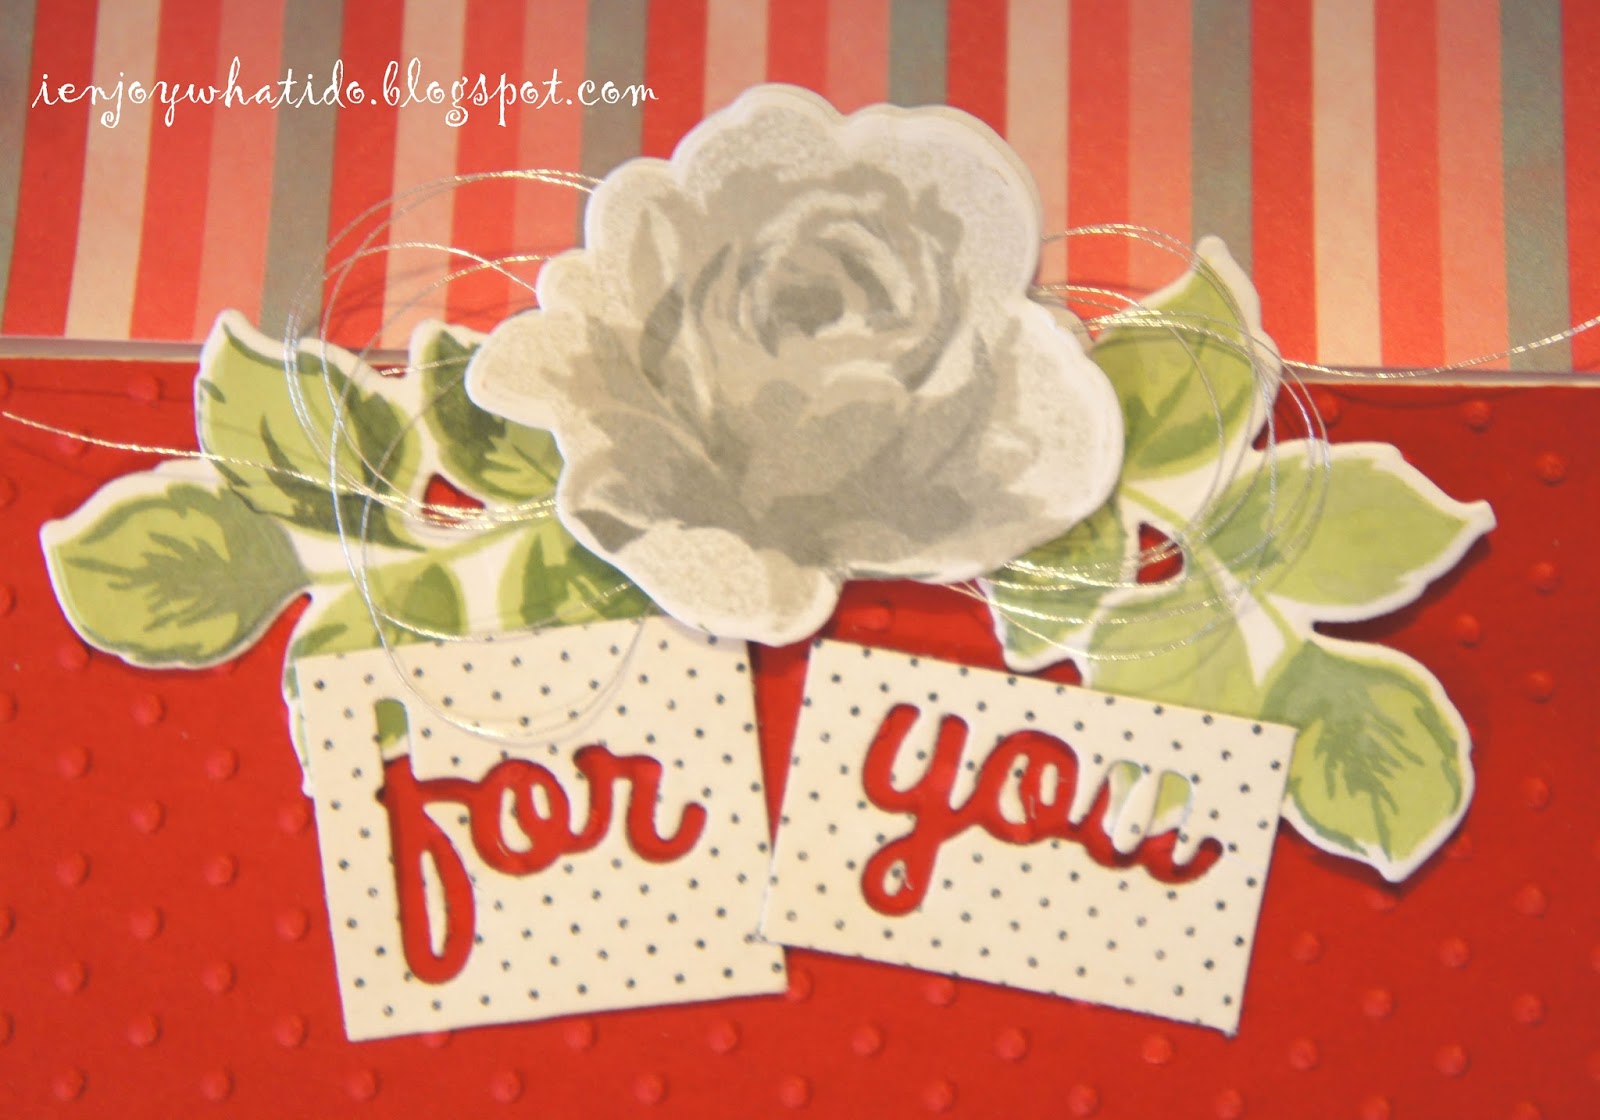
Using a wide, top folding A2 card, I scored the front panel at 2 1/8". Using the coordinating flower die. I made marks on the side of the flower, estimating the middle of the flower from top to bottom. I lined the marks with the score line and adhered the die with a low tack tape. I am going to partially die cut this flower onto the front panel. To save time, I cut a patterned paper at 2 1/4" x 5 1/2". I temporarily adhered this to the top back of the front panel. This will make the cut out aligned with each other by running it together through the die machine.
Temporarily place the flower on the flip spot. Adhere patterned paper by flushing it with the flower. Adhere dry embossed cardstock to bottom part of front panel. Adhere foam tape to back side of flower. Loop a silver thread several times. Pinch it at the middle. Adhere flower with thread underneath it. Using a strong liquid glue, tuck stemmed leaves to back of flower. Adhere sentiment using liquid glue. Apply an acrylic block to top of sentiment while glue is drying.
I was just lucky the small parts of the sentiments didn't fall off after being die cut. Trying a drier sheet during die cutting might do this trick. To adhere the small pieces, apply liquid glue to the back of this pieces while still attached to the sentiment. Pieced the sentiment onto negative space. Apply pressure to the small pieces then carefully remove the word sentiment.. Apply the acrylic block on top of the sentiments while glue is drying.
I created a sentiment strip to embellish the bottom half of the inner card. I also repeated the pattern of the paper. I created a sentiment strip by embossing the sentiment on a red strip of cardstock. I heat embossed this with clear powder. I adhered this to the edge. I adhered the patterned paper next making sure that i didn't cover the notch or the mechanism won't work.
I am also posting photos of the demo card with the same design and concept.
Thanks for viewing my blog.
Maria Giselle B.
Stamps: Altenew Hennah Elements, Altenew Vintage Roses I am submitting this to:


