Showing posts with label Product Feature. Show all posts

Saturday, November 13, 2021

Paper Snowflake Twinkling Fairy Light (Product Feature Week)

Lighted Snowflake In The Dark

Unlighted Snowflake

Lighted Snowflake with Room Light On

Hello! This is my last blog post on my Product Feature Week blog series featuring the Trinity Stamps Big Snowflake Cut & Foil Die Set. If you have time, do check out my previous blog posts on this series to see the versatility of this die set. 

Today's project is the most involving of all the projects I made for this week. After seeing the result, the work put on it is truly worth it. I want to give thanks to Maggie Rose Design Co for her tutorial on DIY Paper Snowflake Garland. It was very helpful. 

The die set comes with 4 pieces of dies, a foiling die, a detailed snowflake die, and two shadow dies. I die cut the detailed snowflake and the third layer on holographic cardstock. I die cut the second layer on platinum vellum paper. 

I cut small pieces of a thick foam tape. I adhered this to the back of the first layer. I carefully adhered the vellum layer to this, making sure the snowflake is lined up. 

I added a mini glue dot to the center back of the vellum layer. I adhered a bulb of the fairy light to this mini glue dot. I sealed this with a craft glue dot, then adhered the solid holographic snowflake layer to this. I repeated this on every other bulb of the fairy light.
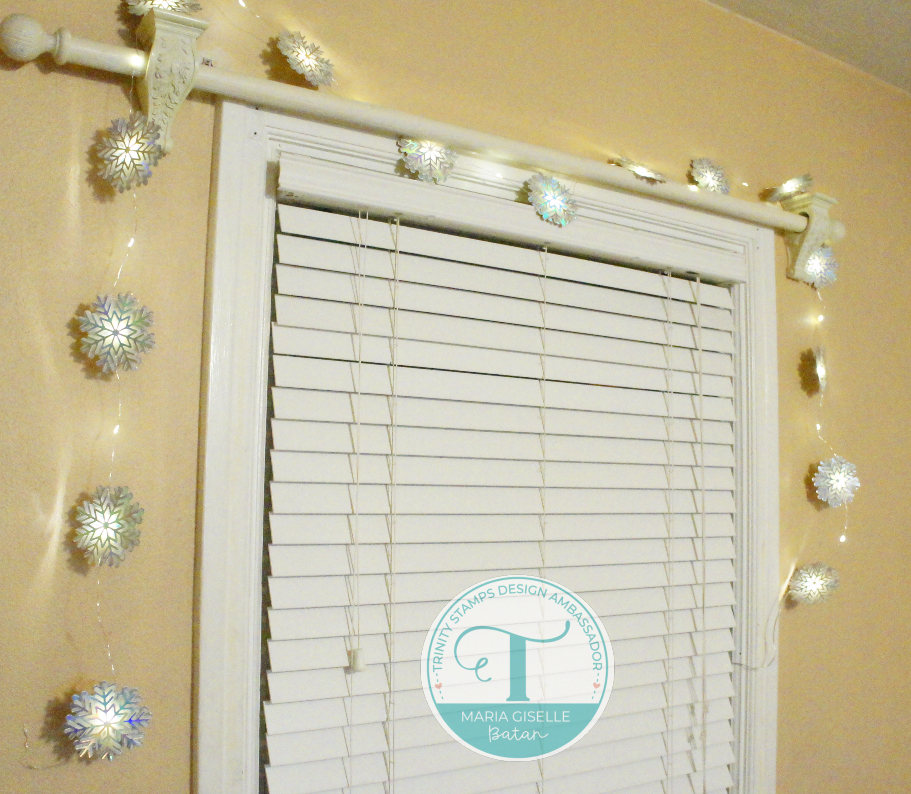


Thank you for visiting my blog. Have a blessed, brilliant and creative day!

I added below the link to the Trinity stamp product I used on this project. There will be no additional cost to you should you decide to purchase this die set. While you are at the Trinity Stamps website, do check out the other amazing Trinity Stamps products including their newly released products. 

Maria Giselle B.


Thursday, November 11, 2021

Snowflake Rosette (Product Feature Week)

Hello! Welcome back! If you have been following me, this is my fifth post this week featuring the Trinity Stamps Big Snowflake Foil & Die Set. I created a rosette using this die. The rosette can be used as a gift box topper or to decorate a jar for gifting. It can also be used as a tree ornament. 

I would like to thank Beth's Paper Cuts for the Scallop Circle Tutorial. It helped me create this snowflake rosette.

Using the third snowflake die, I die cut an Echo Park Paper patterned paper. I die cut two pieces of this. I scored this snowflake layer where the edge of the snowflake dips toward the center of the snowflake.  I cut a slit on one of the score lines. I folded this following the score lines. The key thing to remember, as mentioned in Beth's Paper Cuts, is if you fold one of the snowflakes down, the other one should be folded up. I nestled the ends of the snowflakes and adhered these ends.

I die cut the first layer of the snowflake on four different patterned papers from the same Echo Park Paper collection. On the blue patterned paper, I snipped off the snowflake branches, leaving the center diamonds only. On two of the red patterned papers, I trimmed off the diamonds leaving the snow branches. 


I started layering these snowflakes die cuts. I adhered the diamond layer on the full snowflake die cut, carefully aligning it. I added shimmer to the blue diamond layer with Spectrum Noir clear shimmer pen. I adhered the snow branches layer to the back of the full snowflake, slightly rotating it. I used a glue gun to adhere this layered snowflake to the front of the rosette. I added a TS Stunning Silver Bauble to the center. 

Now, you can add this to a present. Another idea for this beautiful rosette is creating it into an ornament by adhering the third layer of the snowflake to the back of the rosette, then add a ribbon or twine for the ornament hanger. 

Thank you for visiting my blog. Have a blessed, brilliant and creative day!

Below, I added the links to the Trinity Stamp products I used on this project. There will be no additional cost to you should you decide to purchase any of these products. While you are at the Trinity Stamps website, do check out the other amazing Trinity Stamps products including their newly released products.

Maria Giselle B.


Wednesday, November 10, 2021

Stitched Embellishments On A Card (Product Feature Week)


Hello! This is my fourth post on my Product Feature Week series featuring the Trinity Stamps Big Snowflake Cut & Foil Die Set. My card for today has the same detailing with my previous project which is an ornament. Details on how I added the stitching are on my previous blog post, in case you are interested to know how I did it. I did the stitching away from my craft desk so I was able to create an extra one. 

I die cut another snowflake on pink cardstock which I adhered to the back of the stitched snowflake die cut. This adds depth to the embellishment and at the same time, prevents the end of the stitching from loosening up. 

I die cut a holographic cardstock using the third layer die. Instead of lining this up with the snowflake, I rotated it a bit to get a different look. 


I die cut the the letters to spell the word 'peace' on pink cardstock using TS Marshmallow Alphabet Die. I die cut duplicates of the letters as well. I poke holes on the letters and did a running stitch using DMC Diamant Metallic Old Rose Thread, the same thread I used on the snowflake. I used double adhesive tape to secure the thread ends. I added liquid adhesive to the back of the letters then adhered the duplicate to it.

For the background panel, I blended Tim Holtz Distress Oxide Wilted Violet and Seedless Preserves inks on a 4 1/4" X 5 1/2" purple cardstock. I heat set this to speed up the drying. I used one of the stencils from the TS Tree of Lights Stencil set but instead of keeping the tree shape of the circle holes of the stencil, I rotated the stencil so I can fill up the whole panel with scattered circle shapes into which I blended Versamark ink. After I filled the panel with the blended circles, I pounced some Ranger Perfect Pearl Grape Fizz Powder to this. 


I trimmed a sliver off the edges of the purple panel. I adhered the stitched snowflake and letters. I adhered this to a 4 1/4" x 5 1/2" holographic cardstock. I added TS Gorgeous Gold Baubles for some accent.

Thank you for visiting my blog. Have a blessed, brilliant and creative day!

I added below the links to the Trinity Stamp products I used on this card. There will be no additional cost to you should you decide to purchase any of these products. While you are at the Trinity Stamps website, do check out the other amazing Trinity Stamps products including their newly released products.

Maria Giselle B.


Tuesday, November 9, 2021

Stitched Spinning Snowflake Ornament (Product Feature Week)

Hello! Welcome back! This is my third post this week featuring the Trinity Stamps Big Snowflake Cut & Foil Die Set. For today, I created an interactive ornament. 

I die cut the second layer from the die cut set on a blue cardstock. Since I plan to add stitching, to guide me where to poke holes on this snowflake die cut, I embossed the first layer to this die cut. To do this, I positioned the second die cut over the snowflake die cut. I secured it with a low tack tape to prevent it from shifting when I run this through my Sizzix machine. I added the embossing mat over the bottom plate and under the cardstock. The impression created is amazing! I can even leave it as is. But since I am going to add stitching, I poked holes using a needle. I started stitching using a DMC Diamant Silver Metallic Thread. I stitched two blue snowflakes.

I added a transparent thread on the back of the snowflake using a strong thin double adhesive tape. I applied another strip of thin double adhesive tape over the thread to keep it sturdy. I added small dots of liquid glue to the rest of the back of the snowflake and adhered the other stitched snowflake.

To create the frame, I die cut a circle frame using two stacking circle dies on a light blue cardstock. I also die cut a chipboard with these circle dies. I knotted a twine for the ornament hanger. I adhered this to the top center of the circle frame using a strong thin double sided adhesive tape. I snipped a part of the chipboard frame so that the knot will be nestled in between the ends of the chipboard frame.

I positioned the snowflake on the center of the circle frame. I adhered the clear thread to the circle frame using a strong thin double-sided adhesive. I looped the clear thread back to the double adhesive and sealed this with another thin double-sided adhesive.

I adhered the other light blue circle frame on top of the chipboard using a liquid adhesive. I added shimmer to the circle frame with Spectrum Noir Clear Shimmer pen.

Thank you for visiting my blog. I hope you come back again to see what I create next with this product. Have a blessed, brilliant and creative day!

I added below the link to the Trinity stamp product I used on this ornament. There will be no additional cost to you should you decide to purchase this die set. While you are at the Trinity Stamps website, do check out the other amazing Trinity Stamps products including their newly released products. 

Maria Giselle B.


Monday, November 8, 2021

Nordic Inspired Slimline Greeting Card (Product Feature Week)

Hello! Welcome back to my blog. This is my second post on my new blog series featuring the Trinity Stamps Big Snowflake Cut & Foil Die Set. For today's project, I got my inspiration from the Nordic prints, specifically the red and white ones. I am using both colors in this card.

The snowflake die cut is about 3" x 3" when cut, pretty much covering a slimline card's short side. It won't fit three snowflakes unless you cut off a part of the snowflake that will go beyond the length of the slimline card. I am not going for that look. To fit three snowflakes, I did a bit of die cut surgery by cutting off the ends of each snowflake to make it smaller. I layered these snowflakes to give it a bit of dimension.

For the background, I die cut a red cardstock using a rectangular die from the Trinity Stamps Frame and Fold Die Set. This set includes a die that cuts a slimline frame and a slimline panel.

I embossed the red slimline cardstock panel with a 3D embossing folder. I spritz this panel with some water before embossing it to avoid the cardstock from cracking while I ran it through the die cut machine. 

I flicked some silver mica watercolor paint on the embossed panel. 

I adhered the red panel on a top folding white landscape slimline card. 

I adhered the snowflakes to the red panel.

I created a sentiment strip. I stamped the sentiment on a red cardstock using Versamark ink. I poured white embossing powder to this and heat set it. I die cut extra red cardstock strips and adhered it to the back of the embossed sentiment strip for some dimension.

I added gems to the snowflakes.

I hope you are enjoying my Product Feature Series. I hope you come back again and see what I create next using the Trinity Stamps Big Snowflake Cut & Foil Die Set.

Thank you very much for visiting my blog. Have a blessed, brilliant and creative day!

I added below the links to the Trinity Stamp products I used on this card. There will be no additional cost to you should you decide to purchase any of these products. While you are at the Trinity Stamps website, do check out the other amazing Trinity Stamps products including their newly released products.

Maria Giselle B.

I am sharing this creation at


Sunday, November 7, 2021

Foiled Felt Snowflake Ornament (Product Feature Week)


Hello! Welcome back! I am starting another series in my blog. For this week I will be featuring a product from Trinity Stamps. The product that I am featuring is the Trinity Stamps Big Snowflake Cut & Foil Die Set which is a part of their new release. This is such an awesome set! So many possibilities! Before I received this die, I have sketched my ideas on how to use it. I have even more ideas after I have used it.

For this project, I decided to give Glimmer foiling on felt a try. Not really the greatest outcome since the Glimmer foil adhered to the whole felt. Good thing is that I die cut the snowflake. The difficulty arises when trying to die cut this intricate die on felt. It required several passing through the machine. It also needs gentle removal of the negative cuts so as not to accidentally rip off a part of the snowflake. But if you do, you can just piece it in and adhere it to the shadow die cut. Nobody will know that it got ripped off. 

Instead of using glue gun to adhere the intricate snowflake to the shadow die cut, I used Ranger Glossy Accents which actually worked.


I added a white ribbon to the back to create the ornament hanger. I adhered this using a glue gun. Since it is on the back, a little mess won't hurt.

I added a Trinity Stamps confetti on the center of the snowflake. I could have added more confetti but I did not want the attention driven away from the sparkle of the snowflake.

Thank you for visiting my blog. Have a blessed, brilliant and creative day!

I added below the links to the Trinity Stamp products I used on this ornament. There will be no additional cost to you should you decide to purchase any of these products. While you are at the Trinity Stamps website, do check out the other amazing Trinity Stamps products including their newly released products. 

Maria Giselle B.

I am sharing this creation at