Showing posts sorted by relevance for query altenew mother's day. Sort by date Show all posts

Sunday, May 9, 2021

Pop-Up Vase Card


Hello! It has been a while since I last created something to share for Mother's Day. After seeing Jennifer McGuire's video tutorial, I got inspired to create what Jennifer created. At first, I was going to use whatever supplies I have on hand. But after visiting my local craft store, I was not able to resist buying  the supplies I used for this project. 

The supplies I used for this project are:

  • Altenew Craft-A-Flower: Daisy Layering Die Set
  • Memory Box Sunny Orange 110lb 6x6 Cardstock Paper Pad
  • Memory Box Lush Green 110lb 6x6 Cardstock Paper Pad

I die cut the daisy using the colored cardstock, layering it from dark to light. I used a slider die to create the stem. I doubled the stem/slider die cut to make it sturdy. I adhered a solid daisy die cut to the back to make it seamless, covering the tip of the stem/slider die cut. I added dots to the flower centers using a Sakura Black Glaze pen. I think die cutting and adhering the layers are the most tedious tasks for this project aside from the addition of details here and there. 

I don't have the die that creates the vase which Jennifer used in her video. I created my own vase by trimming a white cardstock into 5 1/2" x 3". I scored this at 1 1/4", 2 1/2", 3 3/4" and 5". After I folded the cardstock at the scored line, I adhered the ends together by adding double adhesive tape to the 1/2" tab. I added a layer of silver cardstock to each side of the vase. Each silver panel was cut at 1" x 2 3/4". I created the holding tabs for the flower by trimming a white cardstock at 2 1/4" x 1". I scored this at 1/2" and 1 3/4". After folding the scored lines, I added liquid adhesive to these tabs and adhered it to the inside of the vase.

I arranged three flowers per vase. I added the leaves after. I would have wanted to make the stems seamless too by covering the back part where the leaf is adhered, but this will cause some problems with the mechanism of the pop-up so I decided to go against it.

I decorated the vase with an embossed sentiment strip which I layered with two more sentiment strip die cuts. I punched a hole on one side of the sentiment strip so I can thread the ribbon through it. 

I wrapped the sheer ribbon around the vase. I threaded the ribbon through the hole of the sentiment strip. I adhered a silver glitter foam bow die cut using a glue gun. I added a gem to the center.


Now, it is ready to be given away.

Thank you for visiting my blog. Happy Mother's Day! Have a blessed, brilliant and creative day!

Maria Giselle B.

I am sharing this creation at


Saturday, March 22, 2025

World's Best Dad & Best Mom Ever Greeting Cards


Hello! Welcome back to my blog. I mixed several techniques in today's cards. I did the eclipse technique on a panel created with cardstock strips. I also did my all time favorite technique which is paper stitching. 

I created a dad card and a mom card which can be given any day, not only on Father's or Mother's day. That's why my subsentiment is a non-holiday/occasion sentiment. 

I started of with planning my color combinations for each card. I usually do a search online for color combos that will appeal to me. After going through my cardstock stash for the colors that I need, I trimmed these cardstocks into strips at 4 1/4" x 1/2". 

I adhered a double adhesive sheet on a printer paper cut at 4 1/4" x 5 1/2". I created two pieces of this panel. I adhered the cardstock strips to this panel making sure that each strip is butted to each other. After filling the whole panel with the cardstock strips, I burnished the panel with a scoring tool just to make sure that the cardstock strips are adhered well to the double adhesive sheet.


I die cut the letters from the Spellbinders Stitched Alphabet Etched dies on the panel. I kept every piece that fell off with the die cutting. I added stitching to these letters using DMC embroidery floss. I die cut two more pieces of each letter on black cardstock which I will use to add dimension to the stitched letters. 

I adhered another scrap piece of typing paper to the back of the striped panel. I pieced in the black die cut letters to the negative space on the striped panel. I pieced back the drop out pieces of the striped panel. I pre-treated the striped panel with an anti-static powder tool. I stamped a floral background to the mom panel using Versamark ink. The stamp I used is from Honey Bee. For the dad panel, I stamped several stars using stamps from the Altenew Halftone Stars stamp set. I used Versamark ink in stamping. I poured clear embossing powder to the sticky ink then heat embossed it.

I trimmed an 8th of an inch from each side of the panel. I adhered this striped panel on a 4 1/4" x 5 1/2" cardstock.

I adhered the rest of the letters to the panel by aligning the letters to the letters already pieced in the panel.

I stamped a subsentiment on a cardstock strip using dye inks. I adhered this to the panel.


I hope you like today's cards. Thank you for visiting my blog. Have a blessed, brilliant and creative day!

Maria Giselle B.


Altenew is holding its annual card drive which aims to send homemade cards to the elderly who lives in nursing homes or shelters, and let them know that they are not forgotten. After losing my parents, I feel this is the best way to honor them by making other parents feel special. I hope you consider joining this drive. Please visit the Altenew Celebrating Parents Card Drive 2025 post for details. 


Sunday, May 12, 2024

Split Stamped Image


Hello! Welcome back to my blog. Before anything else, I would like to greet all the mothers a Happy Mother's Day! This is my tribute card to me and to all of you out there on this special day.

I am using the Blank Page Muse Floral Spray Sunflowers Chrysanthemum Line Art Rubber Stamp on today's project. This is a large stamp that measures 4" x 5". It fills up a card front very easily. Today's card shows another way of using this stamp set.

I stamped the image on the center of a 5 1/2" x 4 1/4" Bristol Vellum paper using Versamark ink. I prepped the area with an anti-static tool before stamping the image to control any stray embossing powder which I poured over the sticky impression. The embossing powder I used is the Altenew Peach embossing powder. 

I colored the image using Altenew Woodless Watercolor pencils. I added the concentrated pigment on the center of the image and spread it off to the edges using a watercolor brush to achieve a pastel color.


Once I've colored the entire image. I cut the panel in half on the center both lengthwise and crosswise creating four mini-panels. I rotated the panels so that the embossed image will be at the outer corner when adhered together. 

I flicked the same pink ink I used for the flowers on the panel.


For the focal point, I am using a stitching die from Spellbinders. I die cut the stitching piece on pink cardstock. I stitched a lazy daisy on the holes using a white embroidery floss. I alternated the holes on where I stitched. On the holes without stitching, I stitched a straight stitch using a light pink embroidery floss. I added a pink gem on the center of the stitched holes. 

I die cut the shadow of the letter on blue cardstock. I embossed this piece using a dotted embossing folder. 

I adhered the stitched piece on the shadow die cut using liquid adhesive.

I heat embossed the word mom on green cardstock. I used the same embossing powder I used on the flowers. I fussy cut the word leaving a small border around the word. The stamp is from Lawn Fawn. I adhered this to the bottom portion of the stitched letter. 


I hope this project inspired you. Thank you for visiting my blog. Have a blessed, brilliant and creative day!

Maria Giselle B.

Blank Page Muse is generously offering a 15% discount to their online store to YOU, my blog readers. Just use the code BPMMaria when you check out. Enjoy!

I am sharing this project at


Friday, May 8, 2020

Creating An Interactive Card Using A Stamped Image


Hello! I am guest designing at https://artydivaschallenge.blogspot.com/2020/05/guest-designer-maria-giselle-batan.html today. Thank you, Zowie, for giving me this opportunity.

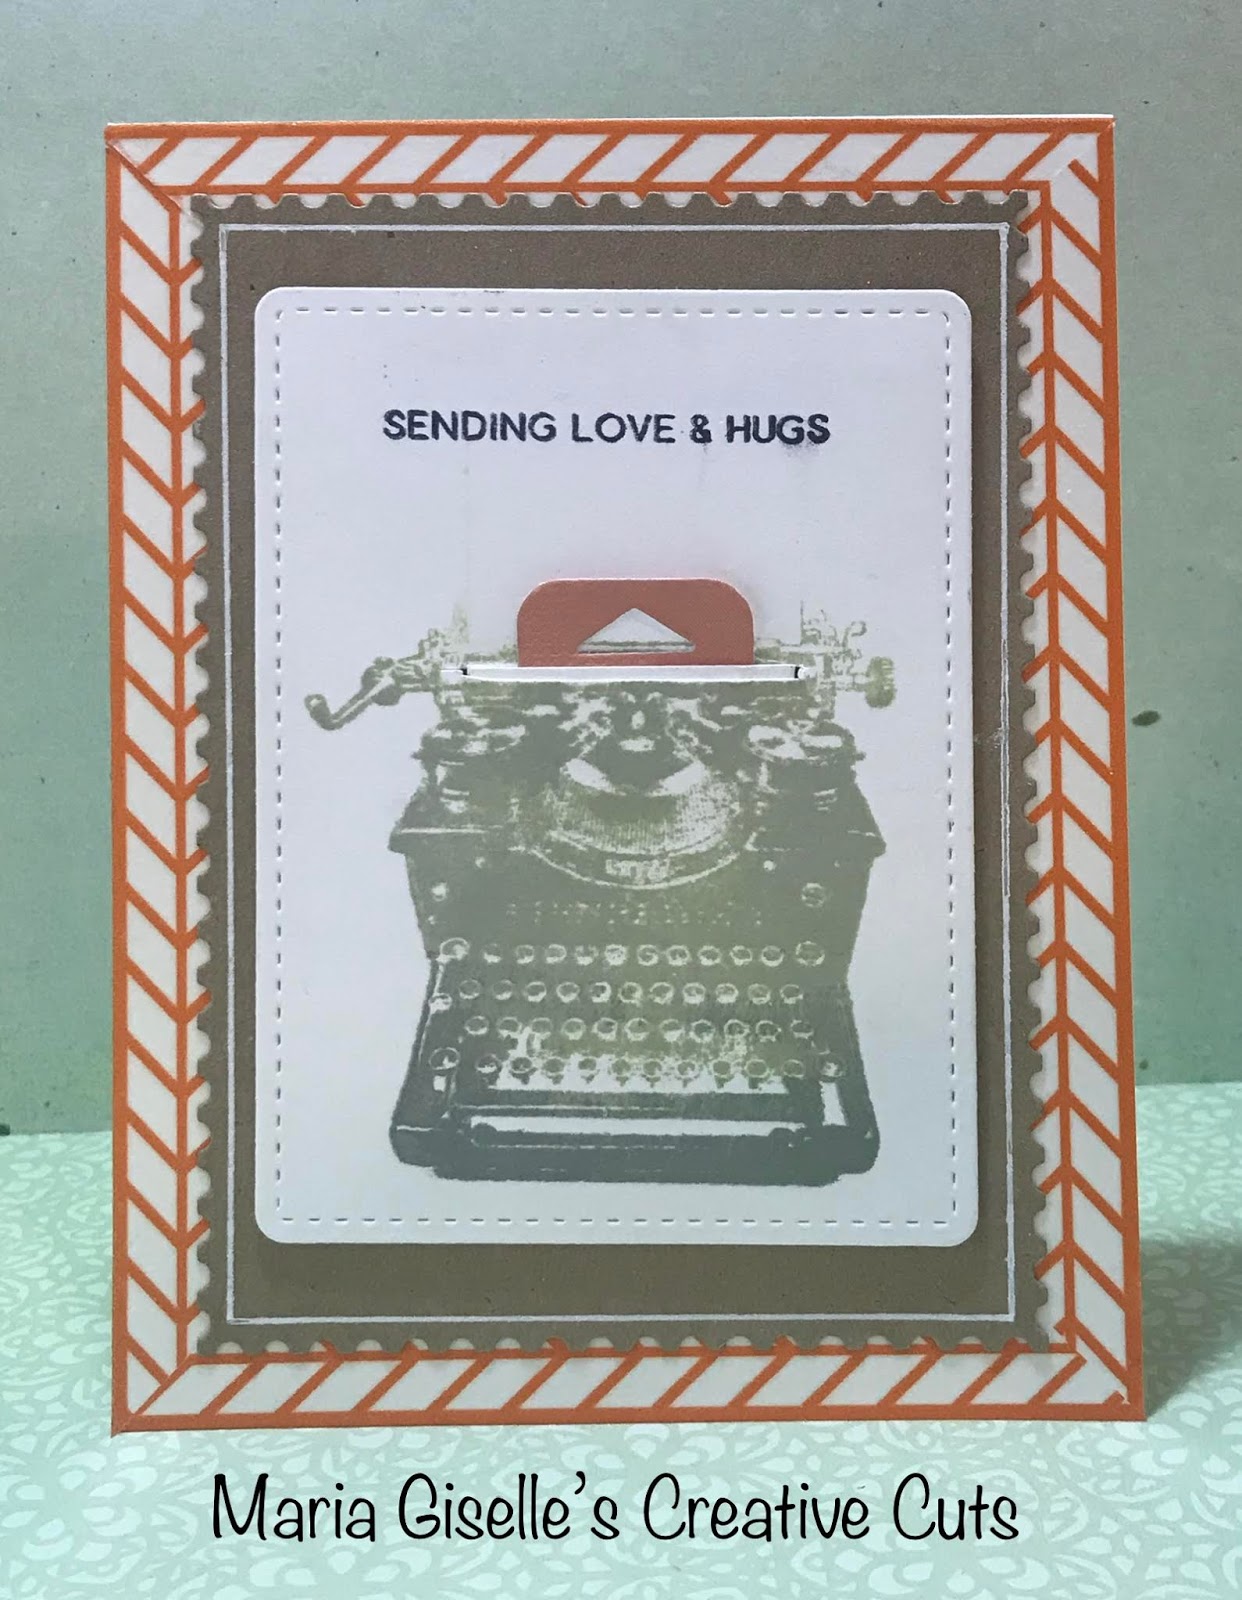
I am using a Close To My Heart Typed Note stamp set. This is my prize after being the random winner at the Double Trouble Challenge last January. Only now was I able to get to play with this stamp set. 

I die cut a white card stock using Mama Elephant Peek A Frame Creative Cuts. I stamped the typewriter using a light and medium gray dye inks, with the darker gray more on the front of the typewriter. I used a Misti Stamping Tool to stamp the typewriter so I can create the ombre colored effect on the typewriter. There is a paper coming out of the typewriter as part of the stamp. I avoided applying ink to this outline, and rubbed off any ink with my finger before stamping the image. 


Using a craft knife, I created a slit on the area where the paper will come out of the typewriter. After measuring its width, I cut a white card stock using the same width. I based the length of this tab on the paper image on the stamp image adding a fourth of an inch on the base to create a stopper so as not to pull the the tab out. I stamped the sentiment on this tab which is also a part of the stamp set. I die cut a colored card stock using this pull tab direction die from Lawn Fawn Flippin' Awesome die set. I adhered this to the back of the sentiment tab and double this up with another white card stock for more durability.

I stamped another sentiment on the top of the typewriter to fill in that white space. The sentiment is from Altenew Adore You stamp set. 

I placed foam adhesives to the back, creating another stopper so that the tab will not go all the way in. I adhered this to a kraft card stock that I die cut with a postage edged die from the same Mama Elephant die set. I drew in a line around this postage die cut using Uni-ball Signo Broad Point White gel pen. 

I adhered this to a top folding note card with the edges covered with an Freckled Fawn orange chevron washi tape. 


I created this card in time for Mother's Day but this stamp set is very versatile that you can use it also in creating a masculine card. You can also customize the sentiment by using a typewriter instead of the sentiment stamps included in the set as long as the message fits the tab or the paper outline.

Thank you for visiting my blog. Stay safe always. Have a blessed, brilliant and creative day.

Maria Giselle B.