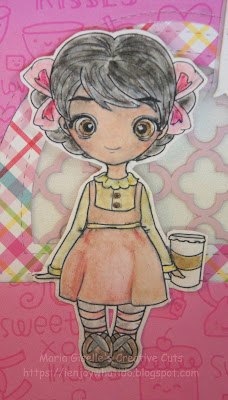
Hello! We have a new challenge at
Incy Wincy Designs Challenge Blog. Our challenge theme is Coffee/Tea Time Challenge. I am late in posting my creation. I struggled with bleeding while coloring my chosen image. I thought I won't be able to salvage it anymore but I am glad I set the image aside. When I came back to it, somehow, I have a different perspective of my colored image. I was able to fix the areas of coloring that I did not like. I did not have to color another image to replace this one.
I used my ink jet printer to print the image on Bristol paper which was not a good combination if you are going to use a water-based color medium. I think the smoothness of the Bristol has to do with the reactivation of the printer ink. I have used watercolor on an ink jet printed image before but I used watercolor paper at that time. I did not have problems with bleeding while coloring compared to this image on Bristol paper.
I used Tim Holtz Distress Crayons on my image. I was picking up the color from the crayon using a water brush. At times, I will carefully apply the color direct to the image, then blend it out using the waterbrush. If I colored out of the line, I rub my finger to the area to take the color away. It is kind of cool on how easy to fix mistakes using this color medium.
I tried looking for a video tutorial on using these crayons on coloring images. I was not successful in finding one. Most of the videos I've seen using this product is on creating colored backgrounds. If you know of one, please feel free to put the link in the comment section. I would love to watch it and learn from it.
I fussy cut the image leaving a white border around it, then set this aside. For the panel, I cut a Doodlebug patterned paper by 4 1/4" x 5 1/2". I trimmed this into two sections. I die cut a window on the top section using Pretty Pink Posh Window Frames die. On the positive die cut, I positioned the smaller window die and ran this thru my Sizzix die cut machine to create a frame to piece in on the window using the reverse side of the patterned paper.
I adhered the frame to a Recollections lattice paper. I adhered a Grafix Platinum paper to the back of this. I pieced in the larger window panel, and adhered this to a top folding white note card.
For the bottom panel, I adhered this to the bottom part of the note card with foam tape. I adhered the digital image next with foam tapes to the top part, and liquid glue to the leg part.
For the sentiment, I die cut a speech bubble from the Lawn Fawn Selfie die set. I had to do partial die cutting to create a bigger speech bubble to accommodate the sentiment. The sentiment I am using is from Simon Says Stamp SimplyBrewing stamp set. I stamped the sentiment with a colored dye ink using the Misti Stamping Tool so I can re-stamp the sentiment with Versamark ink, then heat emboss it using clear embossing powder. I adhered the speech bubble on the same Grafix platinum paper, and fussy cut it leaving a small border around it to create a matted look.
Thank you for visiting my blog. I hope to see your creations in our latest challenge. Have a blessed, brilliant & creative day!
Maria Giselle B.


