Hello! Welcome back to my blog. Today's card features products from Kat Scrappiness which I listed below for your convenience. I am revisiting a technique I have tried before wherein I stitched on an embossed impression made by a sentiment die. Unlike my previous stitched sentiment wherein I colored the sentiment, on this card, I added stitching inside the sentiment. The sentiment is from the KS Happy Birthday Shadow Sentiment craft die. I die cut another shadow piece and adhered it to the back of the stitched piece.
I have limited KS supplies specifically stamps. To add a critter to my card, I selectively inked the quokka from the KS Quokka Easter stamp set. The stamp image has the quokka holding a carrot. I masked the carrot to avoid inking it. If I missed a line, I go back to it, being careful not to ink the carrot. If I inked it by mistake, I wipe off the ink using my finger or a tip of the rag.
I water colored the image using watercolor pencils. I die cut the image using the coordinating die but somehow, I did not position the die right leaving an unequal white border around the quokka. I did not want to redo the quokka, so I end up fussy cutting the image leaving a narrower border around the image. Using a craft knife, I cut around the hands of the quokka to create a place for me to insert a gift. The gift was created with a glitter paper wrapped with metallic embroidery thread. I topped the gift with metallic bows.
For the background, I used the KS Buffalo Plaid Background craft die. I die cut this on a light gray cardstock. I adhered this panel to a grape colored cardstock cut at 5 1/2" x 4 1/4".
To add gift accents to the background, I die cut the squares using the die on different colored cardstocks. I wrapped a metallic twine around this square die cuts to mimic a present. I adhered another square die cut to the back to secure the metallic twine and for a bit of dimension. I pieced these squares back to the plaid die cut.
I adhered the stitched sentiment to the plaid panel. I adhered the quokka with foam adhesive.
I thought about adding some bling to the panel but went against it. I wanted the focus to be on the sentiment and the quokka.
Thank you for visiting my blog. I hope you like today's project. Have a blessed, brilliant and creative day!
Maria Giselle B.
I added below links to the Kat Scrappiness products I used on this card. There will be no additional cost to you should you decide to purchase any of these products. While you are at the Kat Scrappiness website, do check out their wide array of products especially the exclusive Kat Scrappiness products. They have an ongoing promotion, too! Enjoy!
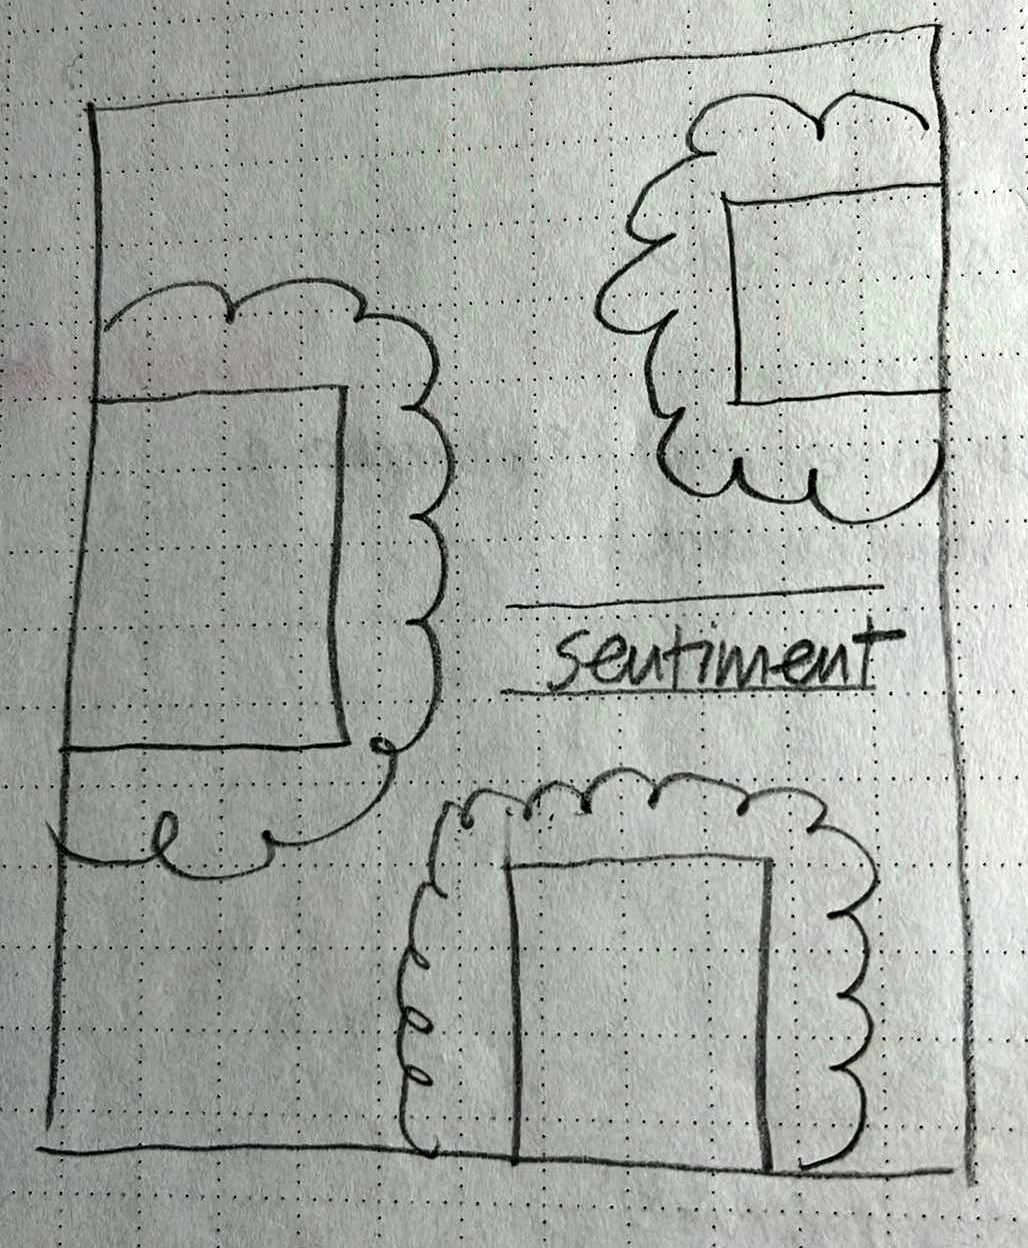
Hello! Welcome back to my blog. We have a new challenge at Incy Wincy Designs. April's challenge theme is/are Inspired by Movie/Song/Book +/or Sketch Inspiration. I am the author of this month's challenge and the sketch illustrator as seen below. As you can see, it is a raw, unedited sketch of mine. I am not knowledgeable on how to create a digital version of my sketch. My apologies.
Do you see those embossed flowers? Those were selectively dry embossed using a the Altenew Sixties Sunshine embossing folder. I die cut circles on white cardstock which fit each flower. I embossed the flower on the circle. I made sure that the flower is centered on the circle before running this through my embossing machine.
I added details to this embossed flower circles by lightly swiping the Versamark ink pad to it so that only the raised edges will get inked. I poured Ranger Holographic embossing powder to the inked areas then heat set it.
I pounced the center with Versamark ink on a sponge dauber. I poured Ranger Seafoam White embossing powder to this then heat set it.
There are three songs sung by different artists with the same title 'Because of You.' Each is different from the other but I like it all. For the sentiment, I partially die cut strips of white cardstock to create my customized greeting. The dies I used are from the Altenew Essential Sentiment Strips Die set. I trimmed this sentiment strip making sure that the space on each side of the sentiment is equal. I pounced the Versamark ink pad to these sentiment strip die cuts. I poured Ranger Seafoam White embossing powder to this then heat set it. I adhered a black cardstock to this sentiment strip die cut. I trimmed off the excess. I traced the letters with a clear glitter pen to mute down the black cardstock. I matted the strips with vellum.
For the card base, I am using a top folding A2 note card. I embossed the front flap of the card using the Altenew Wicker Texture 3D embossing folder. I flicked gray and black mica paint to the the embossed card front.
I added dimension to the circle flowers with scrap cardstock cut with a circle die smaller than the circle flower. I adhered these circles to the back of the circle flower, then adhered these together with the sentiment to the embossed card front following the sketch.
I adhered white sequins to the card front, then added silver drops to the sequin centers.
I rounded the corners using a We R Memory Keepers Corner Puncher.
Thank you for visiting my blog. I hope you join this month's challenge. Have a blessed, brilliant and creative day!
Maria Giselle B.
6/2024: Altenew decided to change its affiliate program starting this month. Below is my affiliate link to the website. I don't think I can directly link the products I used with this new program. Please feel free to do a product search. I will update as I figure this out. The good thing about this new affiliate program is that I get to earn on each Altenew product you purchase and not only on the product/s I used on this project. As before, there will be no additional cost to you if you make a purchase. It is just a way to help a fellow crafter sustain her love for crafting. While in the Altenew blog, don't forget to check out their new release for this month. Thank you for your support!
Hello! Welcome back to my blog. It will be Easter in a week. This occasion inspired me to create today's card for the BPM blog.
I am also trying out a new coloring technique, which is using Tim Holtz Distress Crayons direct to rubber stamp. I have watched videos on the same technique but instead of distress crayons, watercolor crayons were used. Since distress crayons are water reactive, it produced the same artsy image. The stamps I used are from the Blank Page Muse Woodlands Art rubber stamps. There are lots of cute images included in this stamp set.
I cut the eggs using the Cricut machine on light weight cardstock. I used Tim Holtz Distress Oxide sprays and stains to smoosh the color to the eggs. I dried the eggs in between coloring using a heat gun so I can smoosh the egg again using the residual ink on the craft mat.
The letters were die cut using the My Favorite Things Spell Anything Alphabet Die-namics. I die cut this on white cardstock.
I trimmed a 5 1/2" x 4 1/4" white cardstock for the card panel. I added heat embossed clouds by pouncing the Versamark ink on the Blank Page Muse Clouds & Drops 5x5" Mixed Media stencil. To make sure I only apply ink to the cloud that I would like to use for my scene, I covered the other stencil openings with a Post-it note.
I blended Tim Holtz Distress Oxide inks (Salty Ocean and Speckled Egg) to color the sky. This is when the embossed clouds pop since it resisted the ink.
I fringed a wide strip of green paper using an Ellen Hutson die. I adhered this to the bottom edge of the card panel. I adhered the trees, then tucked in the eggs to the fringed grass.
I adhered the bunny next. Isn't the bunny adorable as it looks at the eggs like it is its work of art?
I embossed the word easter using brown and sticky inks. The sentiment is from Lawn Fawn. I partially stamp the sentiment since I only need the word easter. I fussy cut this embossed sentiment leaving a small border around it. I adhered this to the fringed grass to complete this card's customized sentiment.
I hope you like today's card. Thank you for visiting my blog. Have a blessed, brilliant & creative day!
Maria Giselle B.
Blank Page Muse is generously offering a 15% discount to their online store to YOU, my blog readers. Just use the code BPMMaria when you check out. Enjoy!
Hello! Welcome back to my blog. The quokka is featured on several of Kat Scrappiness' stamp sets. One of these stamp sets is the KS Easter Quokkas stamp set which I used on today's card.
I stamped the quokkas on white cardstock. I colored the images using Copic markers. The stamp set also has a bunny ear headband which I also stamped and colored. I die cut the images using the coordinating die. I die cut extras on scrap cardstock and adhered this to the back of the colored quokka die for some dimension.
I die cut the KS Nesting Fishtail Banner dies on white cardstock. I die cut two pieces with one larger than the other. On the larger banner die cut, I covered this with washi tape. I added a trim to the top portion of the banner. I created the trim by adhering the washi tape on a scrap cardstock, then used a border punch. I repeated this step on another washi taped strip but used a different border punch this time. I layered these pieces on the other banner die cut.
I punched holes on the top two corners of the banner. I threaded an embroidery floss through these holes.
I trimmed a mint cardstock at 5 1/2" x 4 1/4". I stamped the sentiment on the panel. I adhered the banners using foam adhesive.
I die cut the KS Stitched Slimline Strips dies on yellow cardstock. I adhered the strip to the edges of the panel to create a frame. Unfortunately, this die set is already retired but there is an A2 sized version of this die set which should work.
I added some splatters to the panel. Not the best thing to do especially when the elements of the card are already adhered. To mute down the unsatisfactory paint splatter, I adhered some KS Fun Flurries Sprinkles to the panel.
I hope you like today's project. Have a blessed, brilliant and creative day!
Maria Giselle B.
I added below links to the Kat Scrappiness products I used on this card. There will be no additional cost to you should you decide to purchase any of these products. While you are at the Kat Scrappiness website, do check out their wide array of products especially the exclusive Kat Scrappiness products. They have a new release and an ongoing promotion, too!
Hello! Welcome back to my blog. I am part of Altenew's Celebrating Parents Card Hop. Altenew hosts this annual card drive which aims to send homemade cards to the elderly who lives in nursing homes or shelters, and let them know that they are not forgotten. I hope you join this drive by sending in your handmade cards. You still have plenty of time. Altenew is collecting handmade cards until April 19, 2024. I added the link to the card drive below.
I created two cards for the hop using the same Altenew supplies. I changed up the color scheme on each card to make a masculine card and a feminine card. The stamp I used for the cards is from the Altenew Patchwork Tiles stamp set. The foiled sentiment was created using the Altenew Vertical Greetings hot foil plate set.
I embossed each tile on different shades of the gray and purple cardstocks. Such a great way to use those scraps. Although you can use a paper trimmer or a craft knife to cut the tiles, I have a square die in my craft stash that perfectly matches the tile.
I made sure that I arranged the embossed tiles in a way that no same color shade is next to each other.
I added details to the stamped images using 3D pens and drops. It definitely steps up the design.
The foiling part was a bit of a struggle since I rarely do it. It took me about three tries before I was happy with the result. I used a craft knife to trim the foiled sentiment, and used a corner punch to round the corners. This foil sentiment set has a coordinating die which is included in the die set.
I matted the sentiment using the same color cardstock I used for the card base. I adhered the sentiment to the panel using foam adhesive.
I hope I inspired you with today's cards and that it inspired you enough to join this handmade card drive. Let us show love to these seniors through the power of cardmaking. Have a blessed, brilliant and creative day!
Maria Giselle B.
Giveaway Prizes
$200 in total prizes! To celebrate this release,Altenew is giving away a $50 gift certificate to 2 lucky winners and a $20 gift certificate to 5 winners! Please leave a comment on the Altenew Card Blog and/or each designer’s blog post on the blog hop list below by March 27, 2024 for a chance to win. Altenew will draw 7 random winners from the comments left on each stop of this blog hop and announce the winners on the Altenew Winners Page on March 29, 2024.
6/2024: Altenew decided to change its affiliate program starting this month. Below is my affiliate link to the website. I don't think I can directly link the products I used with this new program. Please feel free to do a product search. I will update as I figure this out. The good thing about this new affiliate program is that I get to earn on each Altenew product you purchase and not only on the product/s I used on this project. As before, there will be no additional cost to you if you make a purchase. It is just a way to help a fellow crafter sustain her love for crafting. While in the Altenew blog, don't forget to check out their new release for this month. Thank you for your support!
Hello! Welcome back to my blog. Today's project features images from the Blank Page Muse March 2024 Digital Page. This digital set includes mostly St. Patrick's Day themed images. A few of the ephemera can be used for another occasion like I did with today's project.
I downloaded the paper strip image and cropped the strip to separately print the pattern. I printed a pattern on one side of the paper, and printed the other pattern on the other side to come up with a double sided patterned paper. I made this paper into a gift card envelope using the We R Memory Keepers Envelope Punch Board.
I cropped the daffodil from the ephemera sheet. I printed three daffodils, with one slightly larger than the other two, and the other one flipped for a different orientation. I fussy cut these daffodils, leaving a small white border around it. To fit the daffodils in the envelope, I did a bit of surgery, trimming off a part of the bunch.
For the card base, I trimmed a cream cardstock at 10" x 3 3/4". I scored this in half on the long side, coming up with a 5" x 3 3/4" card. I scored the front of the card base at 2 1/4".
I trimmed a scrap of the double sided printed paper at 5" x 2 1/4". I added embossing to this panel using the Altenew Wicker Texture 3D embossing folder. I blended ink to the the raised areas with Tim Holtz Tea Dye Distress ink.
For the sentiment, I adhered the scrap daffodils on a cream cardstock. I die cut this using a Paper Smooches sentiment die. I added some variation to the sentiment by creating a banner to stamp the rest of the sentiment on.
I adhered this to the bottom half of the inner fold of the card which also acts as a stopper for the easel card.
I adhered the flowered envelope to the front fold of the card. I die cut a ribbon using a yellow felt and adhered this to the front of the envelope using a glue gun. I also added a yellow gem to the center of the bow.
I added foam to the back of the flowers to give it some dimension.
I hope you like today's project. Below is a short video showing off the interactive feature of this card. Thank you for visiting my blog. Have a blessed, brilliant and creative day!
Maria Giselle B.
Blank Page Muse is generously offering a 15% discount to their online store to YOU, my blog readers. Just use the code BPMMaria when you check out. Enjoy!