
Hello. I've been asked by a friend to create a birthday card for her second son who turned one last month. The story behind her asking me to do this a second time is that she showed her sons (she has two) the card I created for her first son for his first birthday. She saw how her sons love the interactive spinners in that card that she realized that she didn't have a card created for her second son. It is never too late to create and give someone a birthday card. She wants another interactive card. She said he loves cars.
I wanted to create a sliding story book card but couldn't just come up with the proper mechanism until I saw Jennifer McGuire's videos on slider cards. It was such a great help putting this card together.

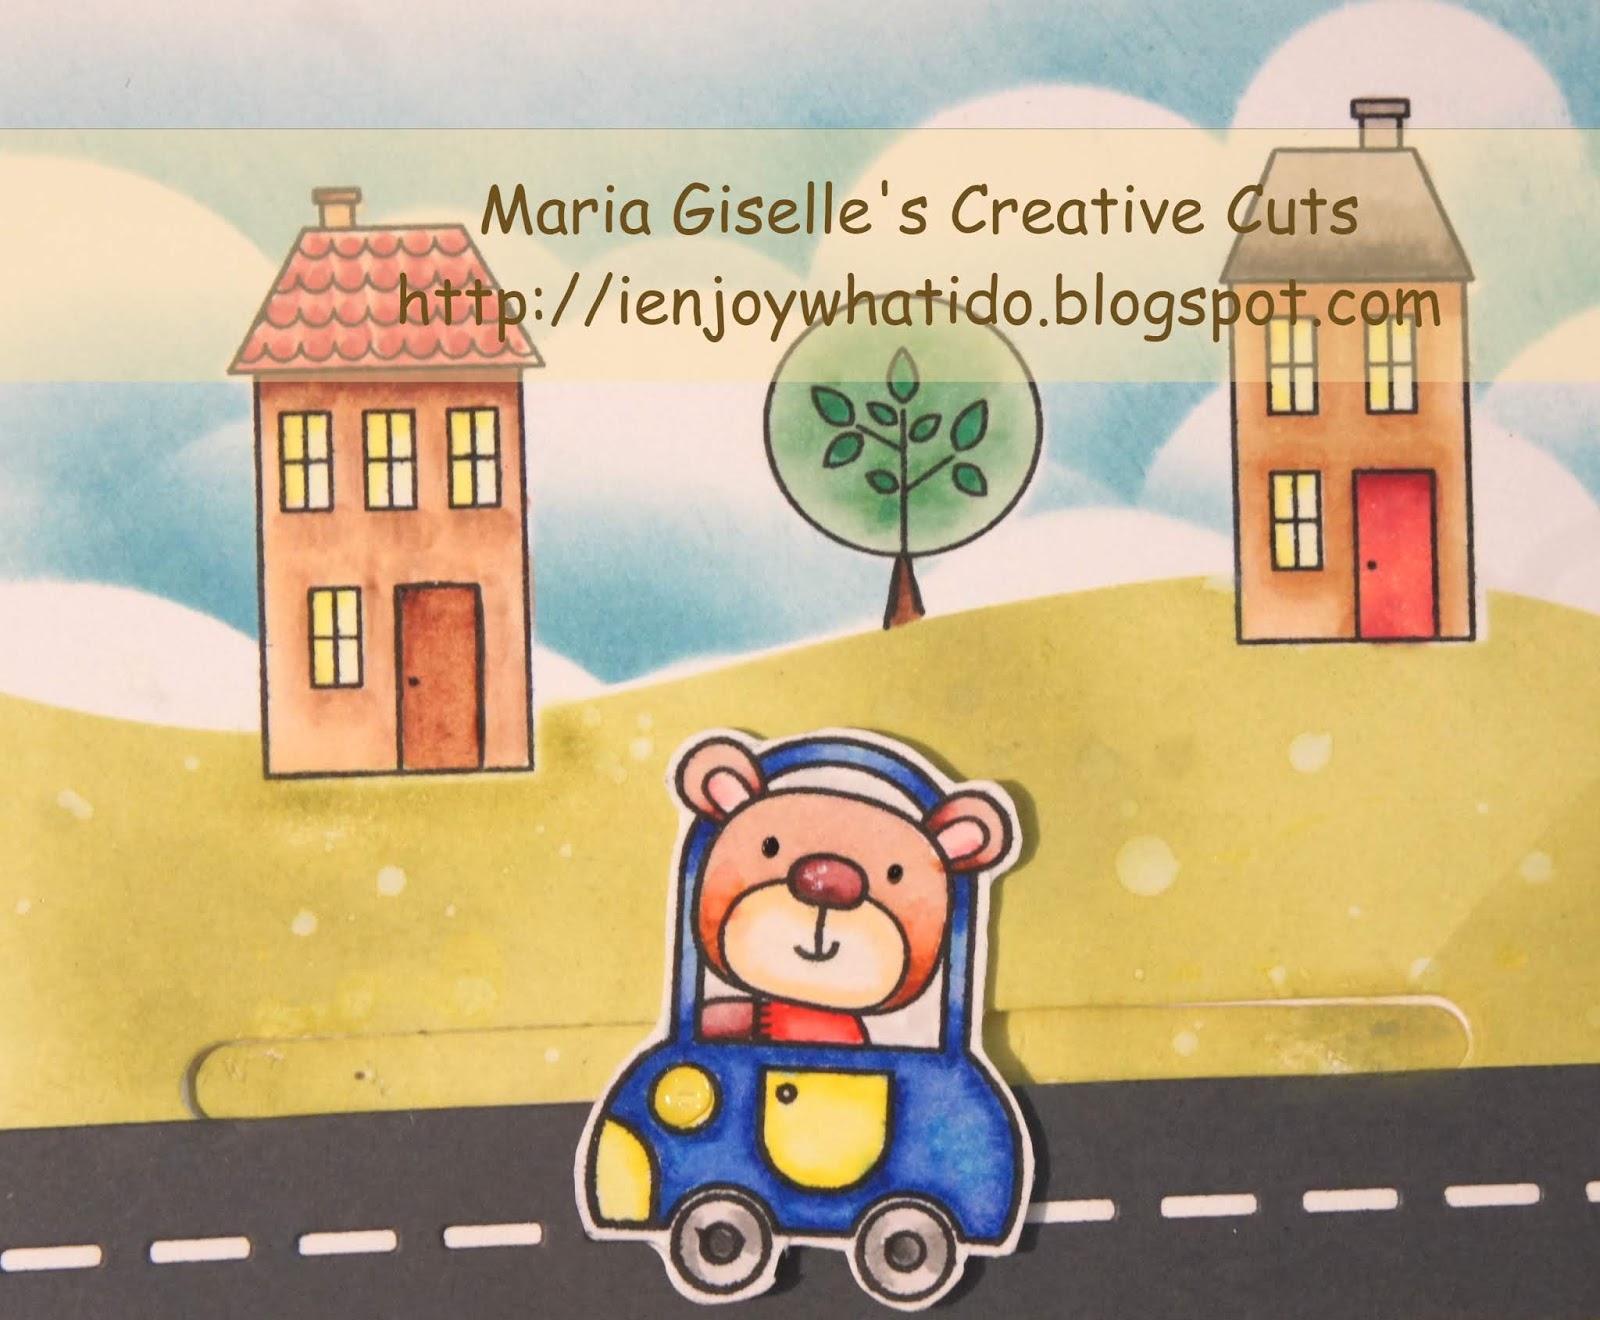
I am using the My Favorite Things Town Bear stamp set for this card. I worked on the inside of the card first. Since this will be a continuous scene, I sketched it first to help me know the image placements, layers, colors and techniques involved in each part of this background scene.
I stamped the bear twice on Strathmore Bristol paper using Versafine Onyx Black ink. After this has dried, I colored the images with Akashiya Sai watercolor brush pens. This stamp set has a coordinating die which I don't have so I fussy cut the images leaving a small white border around it.
For the card base, I am using a Neenah Solar White cardstock cut at 10" x 4 1/4". I did not score this in the middle yet but I did put a tick mark on the center where this card will be scored in half. For the lay-out of the background, I die cut a gray cardstock using MFT Open Road Die-namics. Once I decided on its placement, I lightly traced the sides with a pencil to let me know what area I would not apply ink on. I die cut an Inkadinkado masking paper using Lawn Fawn Stitched Hillside Borders. I adhered this to the the white cardstock, placing it a little below the pencil marks I created on the top side of the road die cut. I positioned the house stamps which will be in front of the hill. I also created masks for the houses and trees. I removed the hill masks paper and stamped the houses. Using a Misti Stamping Tool is very helpful in this step. It did not only help in positioning the stamp but it also helps when you need to double stamp the image to make the impression crisp. I used Memento Tuxedo Black ink on this part since I shifted to Copic coloring. Making sure the stamped houses are dry, I adhered back the hill paper masks which was not a problem positioning it back. The masks has partial stamped impressions of both trees and houses. All I had to do is line up the houses. I then stamped the trees. I adhered the fussy cut trees and the houses on top of the stamped images.
I created a cloud stencil. I die cut an acetate using Taylored Expressions Rolling Clouds die. I used this to ink the sky background of my scene. I am using Tim Holtz Distress Oxide Salty Ocean for the inking.
I removed the hill masking paper, making sure to keep the trees and houses masking papers adhered. I cover the clouds using the other half of the hill masking paper. I also applied tape over the area where the road die cut will be adhered. I inked this area using THDO Peeled Paint. I added some water splatters to this green inked area, lifting off the water droplets with a dry paper towel. I also inked the bottom part of this card which will be the other side of the road die cut.
Now, it is time to reveal how the scene looks by taking off the masks. I colored the houses and the trees with Copic markers. I created two score marks at the center of the card, at 4 7/8" and 5 1/8", not that you need to do this but I thought it will make this card more of a story book if I score it this way.


I started working on the right side of the background panel. I adhered a strip of acetate to the back of the bear. Using a craft knife, I cut a slit to the white portion where the road die cut will be adhered. I worked on the pull-out strip sentiment. I am telling you, this is the second part of this card that I put much time and effort on. The key to it is to practice the slide out piece first before adhering everything permanently. With all the masking and coloring, I do not want to make a mistake at this point. I adhered a 5" x 4 1/4" Neenah Solar White Cardstock to the back.
For the left side of the background panel, I die cut a slider channel using the die in the MFT Open Road die set, keeping the negative die cut. After I adhered the slider elements to the card for this side of the background panel, I worked on the front of the card which will cover this slider channel opening. For the negative die cut, this will be adhered to the back of the front panel after the front panel is assembled.

For the front panel, I die cut a gray cardstock using the wavy road die from the MFT Open Road Die-namics. I also die cut a masking paper with this die. I adhered this to a Neenah White Cardstock mearuing 5" x 4 1/4". I embossed a greeting from the MFT Town Bear stamp set. I inked the sides of the road with THDO Peeled Paint, flicked water droplets to the area, and lifted it with a dry paper towel.
I created the bear using the same process as I did with the other bears. I die cut a balloon on a scrap patterned paper using Birdie Brown Beary Special Birthday. I partially die cut the whole die, since I only needed the balloon using a yellow glittered paper. I taped a silver thread to the back with tape and glue. I added a dot of glue to the base of the balloon then wrapped this with the silver thread. I created a bow and adhered this to the base of the balloon.


To add the last interactive mechanism on this card, I adhered a mini Action Wobbler to the back of the bear, then adhered it to the road. I added a dot of glue to the bear and adhered the end of the silver thread to it, as if the bear is dragging the balloon with him while he drives. I secured the bear on the action wobbler with a strong liquid adhesive. I trimmed off the edges so the card base will mat this front card panel but before adhering, I lined up the negative die cut of the slider to the slider channel opening on the left inner panel. After adhering this and setting up the sliding car, I adhered the front panel with adhesive foam.
After taking photos of the card and watching the card I made for my friend's first son, I realized I did not add the number one to this card. If you notice, one of the photos has a number one on the balloon. I heat embossed the number one from MFT First Place Sentiment stamp. I used Wow! Glow in the Dark embossing powder. I fussy cut the number one leaving a white border around it. I adhered this to the balloon.

Whew! That was some hard work there! I am not even sure if I explained myself clearly here. Feel free to post any questions in the comment section.
Thank you for visiting my blog. Have a blessed, brilliant and creative day!
Maria Giselle B.
I am sharing this creation at

Oh, too stinking cute Maria! Your friend's little boy is going to love this sweet little card!
ReplyDelete