Hello! Welcome back to my blog. I am a guest designer at Send a Smile 4 Kids for the month of December. This month's challenge is Winter Cards 4 Kids. I hope you join their challenge.
My snow globe is not the typical snow globe with shaking elements inside. I created a snow globe that can fit inside an envelope, then pop-ups for display once taken out of the envelope. I also created a place to write a message on.
I used products from Lawn Fawn because of its kid friendly images. The LF products I used are:
- Snowday Remix 6x6" petite paper pack
- Ready, Set, Snow stamp set and coordinating die set
- Ready, Set, Snow Shaker Add-on die set
- Winter Village stamp set and coordinating die set
- Stitched Hillside Borders
- Tiny Tag Sayings stamp set
- Mini Picture Frames die set
I die cut the patterned paper using the shaker add-on dies. I adhered an acetate on the back of the window die cut.
For the layers, I partially die cut the bottom of the window piece so I only end up with the base piece. I die cut this piece on the same patterned paper I used for the window piece. I trimmed this in half. I scored this pieces at 1/4" on both ends. This will be the connecting piece for both the window and back die cuts.
I adhered one of the connecting pieces to the left side of the background die cut. I adhered the other end to the window piece making sure that the bottom portions line up with each other.
For the snow banks, I partially die cut the snow slope included in the shaker add-on die set. I partially die cut this so I can extend the height of the slope. This slope will be adhered to the background piece.
For the middle snow slope, I used a 4"x2" piece of white cardstock. I die cut the slope on this piece using the border die. I used the piece without the stitching detail to coordinate with the slope on the background piece. I scored each end at 1/2". This will be the tabs that will be adhered to the connecting piece.
I pounced Versamark ink to the snow slope. I poured Judikins Iridescent Embossing Powder to the sticky ink then heat embossed it.
For the elements of the snow globe, I stamped the trees from the LF Winter Village stamp set on the trees patterned paper from the paper pad. I used a green dye ink for stamping. I die cut the trees using the coordinating die. I added snow details to the tree using a Marvy Snow Marker.
I stamped the snowmen from the LF Ready, Set, Snow stamp set on white cardstock. I used Memento Tuxedo Black ink since I am coloring the images with Copic markers. I used the same colors as the patterned papers in coloring the snowmen. I die cut the snowmen using the coordinating dies.
I adhered the tall slope on the background piece. I then adhered the trees to the background snow slope.
I applied liquid glue to the left tab of the middle snow slope. I adhered the tab to the connecting piece of the snow globe. Once the glue has dried, I adhered the snowmen on the middle layer snow slope.
I stamped several snowflakes on the back of the acetate. The snowflake stamp is from the LF Ready, Set, Snow stamp set. I used Stazon Cotton White ink in stamping.
I applied liquid glue to the tabs on the right of the middle slope and the connecting piece. I flattened the snow globe to adhere the tabs to the window and background pieces. I made sure that the bottom edge of the snow globes are aligned. I set this aside to dry with something heavy on top of it for better contact.
I stamped the sentiment on white cardstock using the same green dye ink I used for the trees. I used the Misti Stamping Tool in stamping. I re-stamped the sentiment using Versamark ink. I poured clear embossing powder to the sentiment, then heat embossed it. I die cut the sentiment using the coordinating die. I adhered this to the front of the snow globe.
I die cut two pieces of the background on green cardstock and another piece on patterned paper. I scored one of the green cardstock pieces about an inch from the top to create a fold. I adhered the other green cardstock die cut to the back of the snow globe to add stability to it. I applied liquid glue to the top portion of the scored green cardsctock die cut. I lined this up with the back of the snow globe. Now, I have a place to write my message for the recipient.
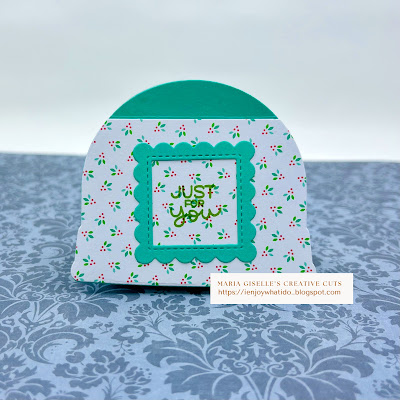
To embellish the back of the snow globe, I partially die cut a holly patterned paper using the background die. I stamped a sentiment on the center using a stamp from LF Tiny Tag Sayings stamp set. I used the same green dye ink I used for the trees. Since the sentiment is small and the design of the patterned paper is busy, I die cut a frame from the LF Mini Picture Frames die set on the same green cardstock I used earlier. I adhered the frame to the holly patterned paper making sure the sentiment is on the center. I adhered this holly patterned paper die cut to the back of the snow globe, underneath the score.
Below is a short video on how this snow globe looks like when taken out of the envelope, and how it pops up into a 3D snow globe.
I hope you like today's project. Thank you for visiting my blog. Thank you, SAS 4 Kids challenge blog for having me again as a GD.
Have a blessed, brilliant and creative day! Have a joyous holiday to you all!
Maria Giselle B.
I am sharing this project at


Maria Giselle, This is phenomenal! Absolutely amazing! This is going to bring a huge smile to its lucky recipient. Thanks so much for joining us as a Guest Designer today at Send a Smile r Kids. Appreciate you... and all you do for SAS4Kids. We wish you and your loved ones a blessed holiday season.
ReplyDeleteWow!! What an incredible card/display/work of art! I am amazed at how you put this together and the incredible result! It's absolutely adorable and I love how it has a scene but also a place to write a message. Thank you SO much for joining us at SAS4Kids as a guest designer and sharing your talents with our readers. Have a wonderful holiday season!
ReplyDeleteSo super cute, and I love the colors you used. Lawn Fawn is just so fun for kids cards, you did a great job on your snow globe design! Thanks you for joining us as our guest this month at Send a Smile 4 Kids!
ReplyDeleteWhat an adorable snow globe card, great card for a kid!
ReplyDeleteThank you for joining us at Cut it Up for our Sparkle and Shine challenge.
Treva
CIU, DT