Tuesday, March 31, 2015

Hello Card

I am inspired by one of the challenge photos of Altenew.


This is my take on this photo...


I only have one Altenew product, the Hennah Elements stamp set. I used the reverse side of a gold cardstock from Michael's. First, I stamped the flower using My Favorite Things Whip Cream pigment ink. I stamp the leaf in two of the flowers. I applied clear embossing powder and heat set it. I filled in the spaces with the small detail stamps in the set using the same ink but applying Ranger Weathered White embossing powder this time. I colored in the center of the flowers and one of the flowers with Wink Of Luna in copper.

I die cut a sentiment using MFT Happy Hello Die-namics. I cut this on a vellum and gold cardstock. I adhered the vellum on top of the gold cardstock but slightly offset it. After adhering the sentiment, the vellum was too subtle for the background. Instead of doing it all over again, I colored the vellum with white Wink of Stella.


Thanks for viewing my blog.

Maria Giselle B.

I am submitting this to the following challenge:


Monday, March 30, 2015

Easter Basket Giveaway

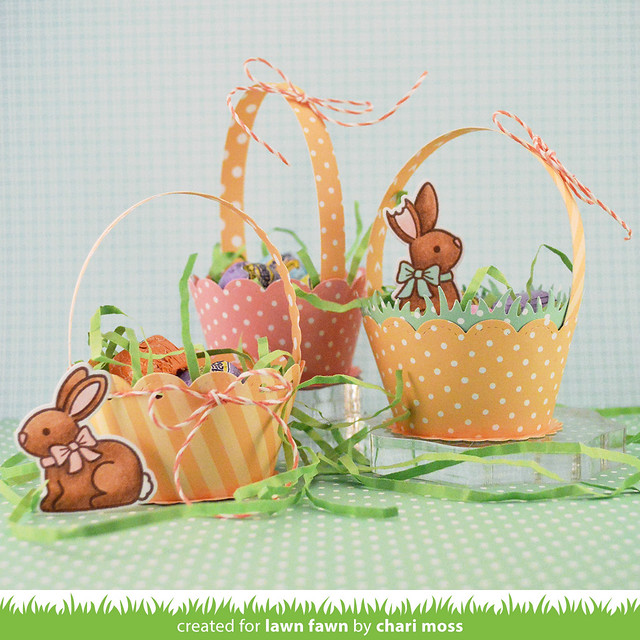
I was inspired to recreate my own version of the Easter baskets made by Chari at the Lawn Fawn blog.


I don't own any of the products she used but I sure wished I have stamp set she used. I used the Cricut Artiste to the cupcake holder and the handle. I punched a scalloped circle for the bottom. I punched holes on the scallops where I threaded a DMC floss through it. I used a Mama Elephant stamp to add a critter embellishment. This is what I came up with...


My youngest son posed to show off this Easter basket...


Thanks for viewing my blog.

Maria Giselle B.

I am submitting this creation to the following challenge:


For You Foiled Die Cut Card

Foil is in these days in paper crafting. But I don't have a laser printer and a laminator but I have a gold foil. I also have a Ranger sticky embossing powder and it does say on the bottle that it will work on foil, too. 

I die cut the flowers and leaves using patterned paper. I applied Versamark ink to the die cuts, poured the sticky embossing powder, and heat set it. I laid the gold foil on top of the die cuts and burnish it using a bone folder. You have to apply firm pressure to transfer the foil to the die cut. It didn't cover the whole die cut with gold foil. I think the sticky embossing powder dried already and/or I wasn't applying consistent firm pressure on the die cut. But it's okay. I think it gave the die cut a vintage look. I also die cut these on vellum to act as an off set shadow of the gold die cuts. 

I used Avery Elle Brushed stamp for the background. I inked the paint strip with Tim Holtz Distress ink Black Soot, sprayed the inked stamped before I stamped it to the watercolor paper. 

The sentiment is from a Hampton Art stamp set. I embellished the card with clear sequins.


Thanks for viewing my blog.

Maria Giselle B.

I am submitting this creation to the following challenges:

My NBUS is the the Ellen Hutson Bold Blossom Stand-Alone die.

Friday, March 27, 2015

Splattered Happy Birthday Card

I've been slacking with blogging and joining challenges for the longest time now. I think that is what 2015 brought to me. I have to get rid of the cloud. I've created but just not posting it in my blog. With this card, I wasn't sure if I will make it in time. But the ideas keep flowing so might as well. Plus, I really want to use my Prima Color Blooms again. The colors in the challenge photo is very similar to a card I previously posted in my blog (http://ienjoywhatido.blogspot.com/2014/10/miss-you-copic-colored-flower-card.html). Besides the photo inspiration, I used this card as another inspiration, since I used the Prima Color Blooms I will be using for this card. The Teal color is hard to see in photo since it doesn't stand out against the black. After this background was heat set and allowed to dry, I ran it using a Mama Elephant stitched die. The die cuts a 5 1/2 & 4 1/4 rectangle but I wanted a bit smaller than this size. I offset the die, making sure the faux stitching is lined up, covered the area I wanted cut with the top plate, then ran it through my Big Shot.  

My latest purchase is from Ellen Hutson. I bought the Bold Blooms stamp set. I stamped the flowers on vellum using an orange dye ink. The ink remained wet despite being a dye ink, so I poured clear embossing powder to it, then heat emboss it. I colored the back of the vellum using a bright orange Copic marker. 

The vellum effect seems to be unnoticeable with the messy background. So I layered the vellum on some fun foam for dimension, which I kept white. This is one of those times that I wish I have the coordinating metal die for this set. Oh, well. I sanded the sides of the fun foam and colored it in with the same orange Copic marker. 


I was aiming for the bottom right corner to adhere these flowers but after several tries again, I had to abandon that plan. How about trying the middle...but something is missing. Hmmm...how about some silver thread.

The greeting was stamped using Versamark ink and powdered with a blue Perfect Pearl.


Thanks for viewing my blog.

Maria Giselle B.

I am submitting this creation to: 


My NBUS is the Essentials by Ellen Clear Stamps, Bold Blooms by Julie Ebersole.


Saturday, March 14, 2015

You're The Best Water Colored Card

I created a card for this week's PS challenge blog hoping that this card will finally blow off the non-productive cloud on top of me. I really would like to water color since I find it challenging and relaxing at the same time.

I stamped the unicorn image from the Spectrum stamp set on water color paper using black Stazon ink. That was a challenge in itself since the lines didn't come out crisp. I re-ink the pad but the results still came out the same. Maybe, I should consider trying a black Ranger Archival ink.

I  mixed up black and white to come up the gray shade that I want to color the unicorn with. The water color set that I used is the Zig Kuretake Gansai Tambi. I also used the white pearl to color the horn of the unicorn. Once this has dried, I traced the outline using a Copic Multi-liner pen as suggested by my 9 year old son. I also created a mask by stamping the image on a Post-It note. I fuzzy cut this image and adhered it directly on top of the unicorn.


I used the Solid Babe block stamp for the background. The ink is Juniper from Close to My Heart. It is very close to the blue color in the photo inspiration if I compare it with my color swatch. I think I inked it too much so it came out dark. Anyway, after inking the stamp, I spritz it with water to hopefully mute it. It didn't get that effect but I liked the splotch of ink effect it created. There are areas which didn't get inked, mostly closed to the unicorn. I rubbed the ink pad on an acrylic block, spritz it with water, and used my water brush to fill the empty spaces.

I die the piece using a scalloped metal die from American Crafts. The die is bigger than the cut I made. I just had to match the scallops on the die and the cut piece to create this smaller frame. I created a background on the  note card using the shooting star stamp from the Spectrum set. I used a gray ink to create a tone on tone effect. The water colored image was adhered with foam tape. I added some gray star sequins from Studio Calico for added embellishment.

The sentiment is from the Recipe for Success stamp set. I cut the sentiment stamp 'You're Invited' to add the You're to 'The Best' sentiment.


Thanks for viewing my blog.

Maria Giselle B.

I submitted this to the following challenge blog. Check it out.