Sunday, September 15, 2013

What's The Buzz?


This week at Paper Smooches Sparks is  Designer Drafts challenge. The inspirational sketch is this: 


This is  my card version as inspired by this sketch. 


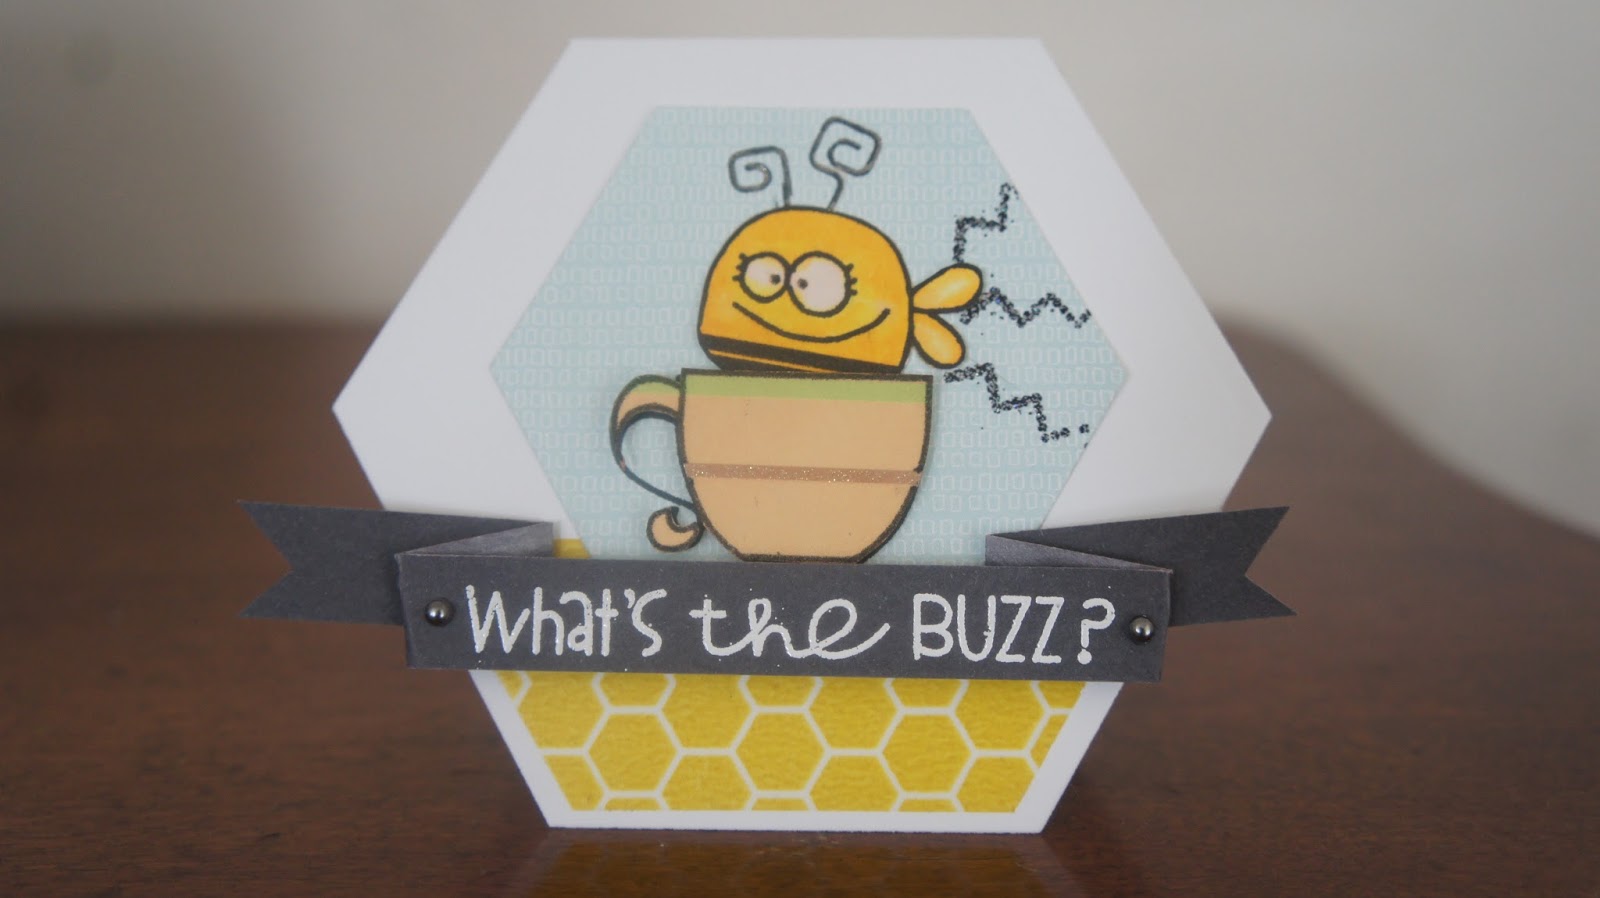
As I've mentioned in my previous blogs, I only own 2 PS Stamps so I work around it to join PS challenges. I think I've over used my Cyber Cafe but it won't be long that I get to add more PS products to it. It's just a matter of choice which I am still having difficulty choosing which stamps I want. For this card I decided to go to their free digi stamps and used the bee. Who wouldn't love this cute bee? I flipped the bee to face the other way. I printed it but since my ink is not a high quality one, I outlined it using Copic multi-liner 0.5. I colored the bee with Copic markers as well. Fuzzy cut it. 

I used several stamps in the  Cyber Cafe set. 

The clear cup was stamped on a patterned paper. Since there is an area wherein it is impossible to fuzzy cut because it is an outline, I decided to stamp it on the patterned paper where I will attach the cup. I was just careful not to lose that small piece by the handle. 


Next one is the steam stamp which I used as the bee antennas.     I marked with a pencil the spot where I want the antennas to be. Masked the stamp to separate the steams & to angle the other one. I also use  the end of the longer steam to extend the length of the shorter steam.  


The wi-fi signal stamp served as the stinger, embossed with glitter embossing powder. I angled it in different ways and used mostly the small dots vs. the bold dots.
 
 
The sentiment is a three lined sentiment which I masked again to create this one-lined sentiment. 

Thanks for viewing my creation. Have a  nice day!

Sunday, September 8, 2013

Another try

I am submitting this card to this week's Paper Smooches Sparks Trend Watch Challenge. I used the Cyber CafĂ© stamp (which is one of 2 Paper Smooches stamps that I own) to create the elements in this card. The techniques I used to make this card is mirror stamping to create a flower vase from the cup solid stamp. I heat embossed, paper pieced it, applied embossing ink, embossing powder, then heat embossed it again. This seems to hide the imperfections of my paper piecing. I colored the outline coffee bean stamp using Copic markers & paper pieced it. This served as my flower petals. For the leaf, I used the tea leaf stamp, colored it & paper pieced it as well. I glued the tips only so I can fold the petals to make it dimensional. I did some masking on my sentiment stamp to create a 1-lined sentiment instead of using the original 2-lined sentiment.  And this is the result...


Finished card

Close-up of the flowers. I used Ink of Stella to line the middle of the flowers & leaves. I used Glossy Accents for the center of the flowers.
 
I used vellum to stamp & heat emboss my sentiment.
 
The blog site...
Visit our Challenge blog
The inspiration...
 
Thanks for visiting.

Monday, July 29, 2013

2 Peas

My order got  featured in What The Peanut Ordered segment by 2 Peas In a Bucket. At first, the video cannot be played but based on the photos of the featured products, I have a feeling it is my order. And, it sure is! Here is the link...

http://www.twopeasinabucket.com/gallery/projects/videos/1935346-what-the-peanut-ordered-7182013/

I ordered because they have a 20% on all products. It was a hard decision which products to order since I would love to have a lot of things, plus I am choosing around a budget. A little over $50 to get the free shipping will be okay. So I focused and thought of things that I might or will use on my current projects.

I am working on my sister's mini travel album. I love Basic Grey's Carte Postale line which I feel I can use to embellish her mini album.

I am also working on me & my husband's long overdue wedding album. I love the gold/yellow color scheme of the Glitz Sunshine In My Soul. I already have the sticker sheet so I think it is just appropriate to get the 6x6 pad.

Another project I am working on is giveaways for my friend's daughter's debutante party on September. Her color motifs are eggplant & chartreuse, explaining the purple & green ink pads. I might be doing some stamping/inking/distressing. Who knows?!

The others are things I am very interested in. Got the Two Peas Exclusives and the Studio Calico Atlantic 6x6 pad which I've been looking for at Archiver's but they only have the 12x12 patterned papers. We R Memory Keepers cardstock is always a double treat for me. Being two toned, you have a lot of possibilities for its use.

No photos today. I will be posting photos of these projects once I am done or maybe close to being done.

Saturday, June 1, 2013

Corsage

My 11 year old is in band. They just had their end of the year, spring band concert. Last year, I gave his band teacher a paper flower bouquet. So for this year, I thought of giving her a paper corsage. Cricut has a digital image for the corsage but it is a hand corsage. With Google, my hits are mostly hand corsages. I don't think it will be a good idea to give her a hand corsage, with all that arm movement. So I persistently looked through the net, then came up with a plan. I cut the flowers using the Cricut Artiste cartridge. Had to cut and find the right size. I initially used a wire and used glue gun to attach it to the base of the flower. It was a fail since the dried glue came off the base of the flower. I know I should opted for floral wires sold at craft stores but I wanted to be thrifty this time and just use something I have. The solution, pipe cleaners! It held the glue pretty well.
     So here is the finished project.


Tuesday, May 28, 2013

Film Strip Reel

The time I saw this in Authentique's blog (http://blog.authentiquepaper.com/search?updated-max=2013-05-13T05:00:00-07:00&max-results=7&start=8&by-date=false), I was challenged to make my own version of it. What better occasion to try making this but my supervisor's birthday. So I kind of planned this out since I don't have the same tools that Loes used in her project.
     I've designed a viewmaster cut-out in Cricut Craft Room a long time ago and saved it since I haven't found any use for it in any of my projects. Finally, I found the oppurtunity. I had to re-adjust the lay-out based on Tim Holtz' Die-cut. It wasn't perfect but it came out acceptable with the imperfections unnoticeable.
     For my film strip, I used my EK Success puncher. Had to practice a couple of times to figure out how to connect the strips together.
     And now the biggest challenge is having my co-workers write their names on a cut-out paper to put inside the film strip instead of pictures as the original version has. What a better way to use my scraps! I got about 40 names total. I wasn't able to collect everybody's name since I didn't get to see everybody when I work. I also put sentiments in between batches of names.
     It was a 'gluey' experience between using different kinds of adhesives from wet to tape to glue gun. But the end result was 'wow!' Especially, when I handed this to my boss. She can't help but say, "Oh, my gosh!" And I'm glad she loved it.
   
Top View

Side View

Closed-Up View of Flowers

Unrolled Film Strip (Top View)

Unrolled Film Strip (Side View)

Start-off sentiments

Her birthday

Our unit and my fave Hello Kitty

 Another sentiment with my 2-toned Copic coloring on the speech bubble

Another sentiment...see my name?
I am also submitting this to Simon Stamp Say "Take A Picture" challenge. I know this is not a typical card but it was made it that way. Thanks, Loes for the inspiration.

Ok...Smile

I made this card for Simon Says Stamp Challenge "Picture Perfect." My design was inspired by cards made by 2 of my favorite designers, Kristina Werner (where I got the envelope idea) and Julie Ebersole (where I got the pull-out idea.) I smashed their cards and came up with this card.


Sunday, May 26, 2013

Farewell Card

My next post is a farewell card I made for a co-nurse who is going back to her hometown Kansas City. I had my other co-workers sign the card for me. I wasn't able to personally hand it to her since she didn't come to work on her supposed last day. I mailed it to her instead. Had to wrap it with tissue paper. I didn't hear back from her so I hope she got the card in the mail.

I got my inspiration for this card on a blog hop by SimonSaysStamp. Here is the link http://shari-design.blogspot.com/2013/03/simon-says-stamp-exclusive-spring-2013.html. I thank Shari for the inspiration.